Feature Synth
This is a rework of yet another abandoned project! I realised that I was trying to make synthesisers, when composers wanted sounds with specific features! So...
The story
I have been concentrating on complex detailed sounds, and flexibility, and it seems that many composers don’t want these at all! What they want are straightforward ‘Features’ – Bass, Wobble, 70s Sawtooths, 2010s Square waves, and on and on. So I did a 90 degree turn and made a virtual instrument that lets you choose the features you want in a sound, and it gives you them. No fancy Quad Chorus, No Double Delay, just basic features.
So, if you want a timbre, then ‘Feature Synth’ may be what you are looking for! I’m now looking for more cliche features fo the follow up – I’m thinking of calling it Feature Synth 2, or is that too obvious?
There are 12 Cliche features, three envelopes, and no on-board effects. Yep, back to basics, or ‘Use your own effects’, as they say.
There’s also a sly homage to the LABS logo, if you want to go looking…
(Feature Synth can make big demands on Decent Sampler. If you get clicks, then try legato playing with fewer notes and less mic sliders showing orange bars, and reduce the Release time.)
The sounds
You won’t be surprised at all that I created all the sounds myself. I used some maths, a spreadsheet, Audacity (the open source audio editing software), and a lot of experience (which at my age, has some wow and flutter in it!). So there was no sampling of Generic 70s, 90s and 2010s synthesisers, which is a shame, because it is an unusual brand that most people have heard of, but don’t have one in their collections.
The sub-bass is variations on a saturated sine wave (not the more popular version by Paganini). I’m wondering if I should add some mains hum, some intermodulation distortion, and maybe some aliasing? I made a MaxForLive plug-in that does all of that, and one reviewer said: ‘Truly one of the best sounding audio fx available’, which is praise indeed.
The Sky, Roll and Wobble are just heavily low-pass filtered sawtooth and square waveforms at different pitches to emulate detuned analogue oscillators. Note that I said ’emulate’ – I didn’t record any analogue oscillators. The original project behind this release was an additive synth, and so everything was synthetic, rather than real – and analogue additive is a tuning nightmare, imho.
The 70s, 90s and 2010s saws and squares are less filtered versions of the Sky Roll and Wobble samples, but with additional processing to suit the era. So the 70s versions are detuned, the 90s versions are chorussed, and the 2010s are chorussed and compressed. I have left the loop glitches in because it makes it sound like badly looped samples – as I said, I’m sometimes deliberately adding various deliberate lo-fi elements to some of my virtual instruments to see what the reaction is… So I await the hordes of reviews…
The User Interface (I’m notorious for these)
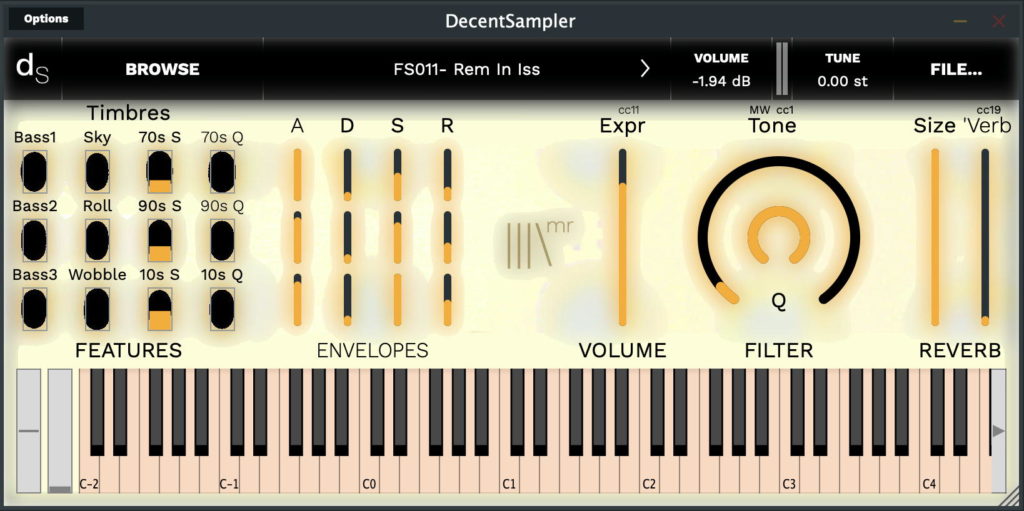
There are two sections, from left to right. The left hand side has the main control over the features and how they change over time (the envelopes), the middle section has just my usual ‘bar bar bar slash mr’ logo and does absolutely nothing, and the right hand section contains the performance controls: Expression, Filter and Reverb.
The left-hand section.
There are three rows. Each row starts on the left hand side with four black blobs that represent four feature ‘timbres’ that you might want in a sound. If you click and drag in one of these blobs, then an orange bar will appear and get taller (and louder) as you drag upwards. Drag the bar downwards to reduce the volume of the part. These are what would otherwise the called ‘mic’ sliders in virtual instruments. Yep, it’s a mixer! Move the mic sliders upwards and you will get a mix of up to 12 timbres. The exact sounds that you will get will depend on the settings of the mic sliders. For now, just hold down a note and adjust the sliders until you get a sound that you like. Note that the ‘mic’ sliders do not need to be set to maximum – half-way is fine for most purposes, especially when you are mixing together lots of features… (which just muddies the sound, but I’m sure that you already knew that!) This is also a good time to set the Tone control, which rotates clockwise to make the sound brighter…
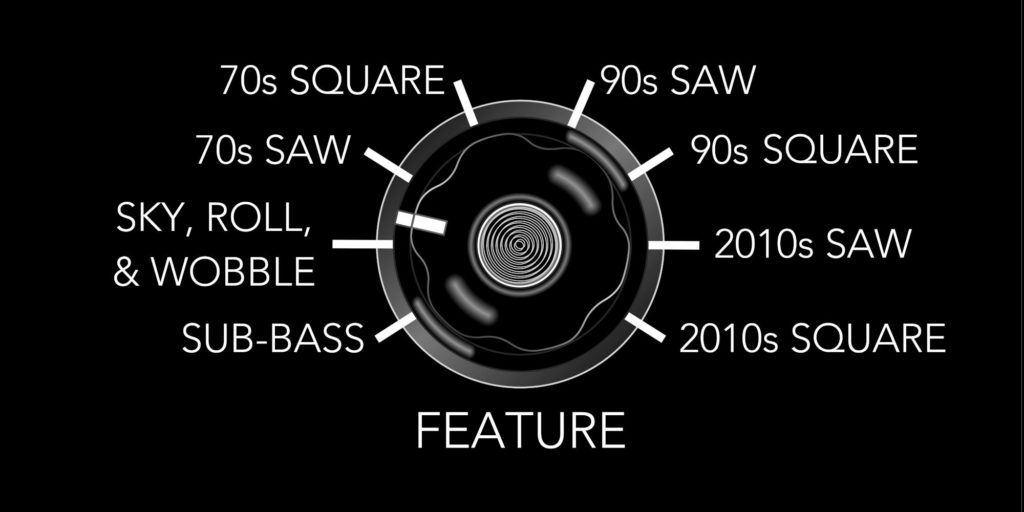
So what are the twelve almost-mythical sound/timbral ‘features’ that I have chosen? Well, after a lifetime of playing and programming synthesizers, it didn’t take me long to decide that some strong contenders were: Sub-bass, Sky/Roll/Wobble and phased Sawtooth waves or sQuare waves from the 1970s, 1990s and 2010s… So that’s what you get in this first edition.
On the right of the mic sliders are 12 sliders that control the envelopes. Because there are three rows, then there are three envelopes – each row has its own envelope, so you can control what happens over time for each row separately. I have implemented full ADSR control over the envelope of the sound, which is what those A D S and R letters refer to.
A – is for Attack, and it controls how quickly a sound starts. So low settings (a tiny bit of orange) will give fast starts to sounds. A big orange bar will give slow starts to sounds.
D – is for Decay. Not a comment on capitalism, or teeth, but instead, more of that boring time control stuff. In this case, the Decay is what happens after the sound has started – or more precisely how quickly it does that. And it turns out that this depends on the setting of the next control, so let’s look at them together…
S – is for Sustain, and it isn’t anything to do with time! It is true! The ‘Sustain’ control sets the level that the sounds will settle at when they keys are held down. In a piano, this is usually a low level, but for pads or string sounds, then a higher level is more usual. I didn’t forget that Decay control – it controls how quickly it takes for the sound to get to the Sustain Level. So, if you have the sustain level set high, then the Decay does… nothing much, since the sound has already got to the maximum volume at the end of the Attack stage, and there’s nowhere higher for it to go! But if the sustain is set to lower than the maximum value, then the decay sets how long it takes fir the sound to get to that volume. If the sustain is set to very low, then the sound will decay down to a very low level! If you set the Attack and Decay to very fast, and the Sustain to very low, then the sound is going to rapidly get as loud as it can, but then drop down very quickly, to the low level set by the sustain. So you will get a very quick, short ‘blip’ sound (good for arpeggios). There’s a lot that you can do with envelopes…
R – is for Release. The ‘Release’ control is back to time again. The higher up the orange bar is, the longer time that the sound will linger around when you let go of the keys. (I was going to say ‘release the keys’ but that’s just silly!). The lower the orange bar is, the shorter the time that the sound will linger around for… You might want to try balancing this control with the Reverb control on the far right, of which more in a moment or two… At the risk of being a CPU bore, I have to remind you that longer release times increase the CPU processing load…
The middle section is boring. It has my logo and nothing else. Move on. Nothing to see here.
The right-hand section.
The right hand section contains the performance controls: Expression, Filter and Reverb.
Taking them from left to right…
First, the Expression control, which is mapped to MIDI CC 11, gives you a vertical slider that controls the output volume of Decent Sampler. This is how you control the volume or loudness, of the sound! It is also how you can compensate for the volume ‘droop’ in the chorus section, controlled by MIDI CC18…
Next, the Tone rotary control (MIDI CC 1, also the Mod Wheel) controls the cut-off frequencies of two 2-pole low-pass filters (differently, of course): high is open, letting all frequencies through, low is closed, letting only low frequencies through – the Tone control is mapped to MIDI CC 1: the Mod Wheel the grey bar next to the virtual keyboard. The Q’ rotary control sets how resonant the filters are – at zero they are flat and boring, at 1 they are peaky, resonant 24 dB/Octave digital filters that are fine, but definitely not analogue. Don’t be afraid to try moving the Low-Pass Filter and Q rotary controls around – there is a lot of control over the timbre available! The sounds from the ‘mic’ sliders are deliberately bright, so you can cull the high end using the Tone controls. Have no mercy – filter those frequencies like it’s 1999…
The final area on the right hand side has only two sliders. They control the Reverb effect… The ‘Size’ slider sets the size of the room that the reverb is emulating, whilst the ‘Wet’ controls is like the Delay ‘Wet’ slider, it only controls the amount of reverberated sound that you will hear. The dry sound is always audible. The ‘Wet’ slider is mapped to MIDI CC 19.
Quick-start
I’d probably use a starting pistol for most athletics races… For other purposes, then here’s how to approach your first session auditioning Feature Synth:
– Choose just about any combination of the three rows of feature/timbre ‘mic’ sliders…
– Set the Attack sliders to fast (low)
– Set the Sustain sliders to High (high)
– Set the Release sliders so that just a little bit of orange bar is showing.
– Set the Tone control (the outer circle) to about half-way (at the top)
You should now get a sound when you play the keys on the virtual keyboard or on your connected MIDI keyboard or DAW.
Three envelopes? Some pointers…
(Yep, it’s probably a bit scary. But here are a few tricks of the trade…)
First, programming presets is all about differences. If you have slow attacks, then the time should be different for each envelope. You can take this further and give the slowest attack has the longest release. Sustains should normally be different levels: not all max or all min. Decays set how long it takes to get to the boring bit when you are holding down the keys, so make one of the decays longer so that you get movement even when you hold the keys down for a long time – and make sure that the other two decays are different again so that there’s interest and movement in the sound.
Choose the Feature sounds carefully: If you choose the Bass for all three rows, then those envelopes are going to need to be super special to make the sound interesting. Instead, you could try having one row with a contrasting timbre, and then make it a shorter and down blip at the beginning, or slow attack and release (and low level) so that it smoothly fades in and out deep in the mix. Or experiment! (Which really means that you can ignore everything I have said here and do your own thing!)
Three envelopes open up all sorts of dynamic contrasts and continuous changes. Make the most of them! Oh, and explore the presets to see what I do… (Speaking of which…)
Presets
Some of the reviews of my other Sample Packs said that there were too many controls, so I have included a few presets as starting points, and to show the versatility of Feature Synth as a sound source.
MIDI Controllers
1 ‘Modulation Wheel’ controls the Low-pass Filter Cut-off Frequency, the ‘Tone’
11 ‘Expression’ controls the output volume
19 ‘General Purpose 4’ controls the Reverb Wet/Dry mix
The video below shows how the user interface works, although it uses a totally different instrument as an example.
V1.0
The UI for a different instrument...
Interface
Reviews
A synth with endless possibilities!
The king of synths is back with another big instrument packed in a small size. This time it's about some classic retro synth sounds, split in 12 different layers and grouped up into 3 zones. The zones are there just to have a better control of ADSR, which is more than enough to create small evolutions depending on the sounds you will pick.
All the samples are very well created as always, and there are many presets for the user to go through in case they don't feel like spending time to create their own unique sound.
A lot of synths
I love that the pack has more than 10 presets, it makes it easier to use all the content. It's also great that you have integrated several controls, as these allow you to play with the sounds for quite a while.
The GUI is visually striking, but it could look better. I would say that the dimensions should be different, so that the resource is not so rectangular.