Monolith Sampling System
Quick Start
If you are already familiar with the monolith system and just want to get the latest templates you can get them here.
To learn more about the system and how to use it, you can jump to the various sections here:
- Introduction
- What sounds do we capture for a virtual instrument?
- What is a Monolith Sample?
- What is a Heat Map Sample?
- How do I record a monolith?
- How do I edit my samples?
- How do I load my samples into Kontakt?
- How do I load my samples into SFZ?
- How do I load my samples into DecentSampler?
Introduction
From the very beginning of the Pianobook community we were looking for ways to make sampling more accessible. A starting point for this was to come up with a template to help people make recordings of instruments. The monolith system is an evolution of that original MVP technique.
The main aim of the monolith system is to keep the majority of the audio manipulation within the familiar world of Digital Audio Workstations (DAW), such as Logic Pro, Pro Tools, Cubase, Ableton, etc.
By following a particular structure when building the audio files, we can simplify creating virtual instruments in the various sample engines such as Kontakt, SFZ, Logic Sampler, DecentSampler and more. We can create instrument templates that can make it easy to just drag in a file and immediately play the instrument without needing any configuration within the sampler.
What sounds do we capture for a virtual instrument?
Depending on usage of a particular virtual instrument we may want to capture a range of sounds to help increase the realism when playing back the instrument. For a piano these sounds can include:
- Notes with pedal: the sound of a note played whilst the sustain pedal is down
- Notes without pedal: the sound of a note played whilst the sustain pedal is up
- Release triggers: the sound of the piano mechanics returning back to their default position after a note is release
- Pedal noises: the sound of the sustain pedal being pushed down and being released back up
- Round robins: the same note/sound played multiple times to capture the natural variation when played
There are some addition options we may want to capture, for example recording with the “practice pedal” engaged to add a layer of felt between the hammers and the strings.
It is entirely possible to create a very inspiring instrument without capturing all these variations and the monolith system provides flexibility to choose what you feel is best for the usage you want from the instrument.
What is a Monolith Sample?
A monolith sample is a single audio file that contains all of the notes (and other sounds) from a recording of an instrument. The file is laid out in a particular way so that it is possible to calculate the position of any note as a number of audio samples offset from the beginning of the file.
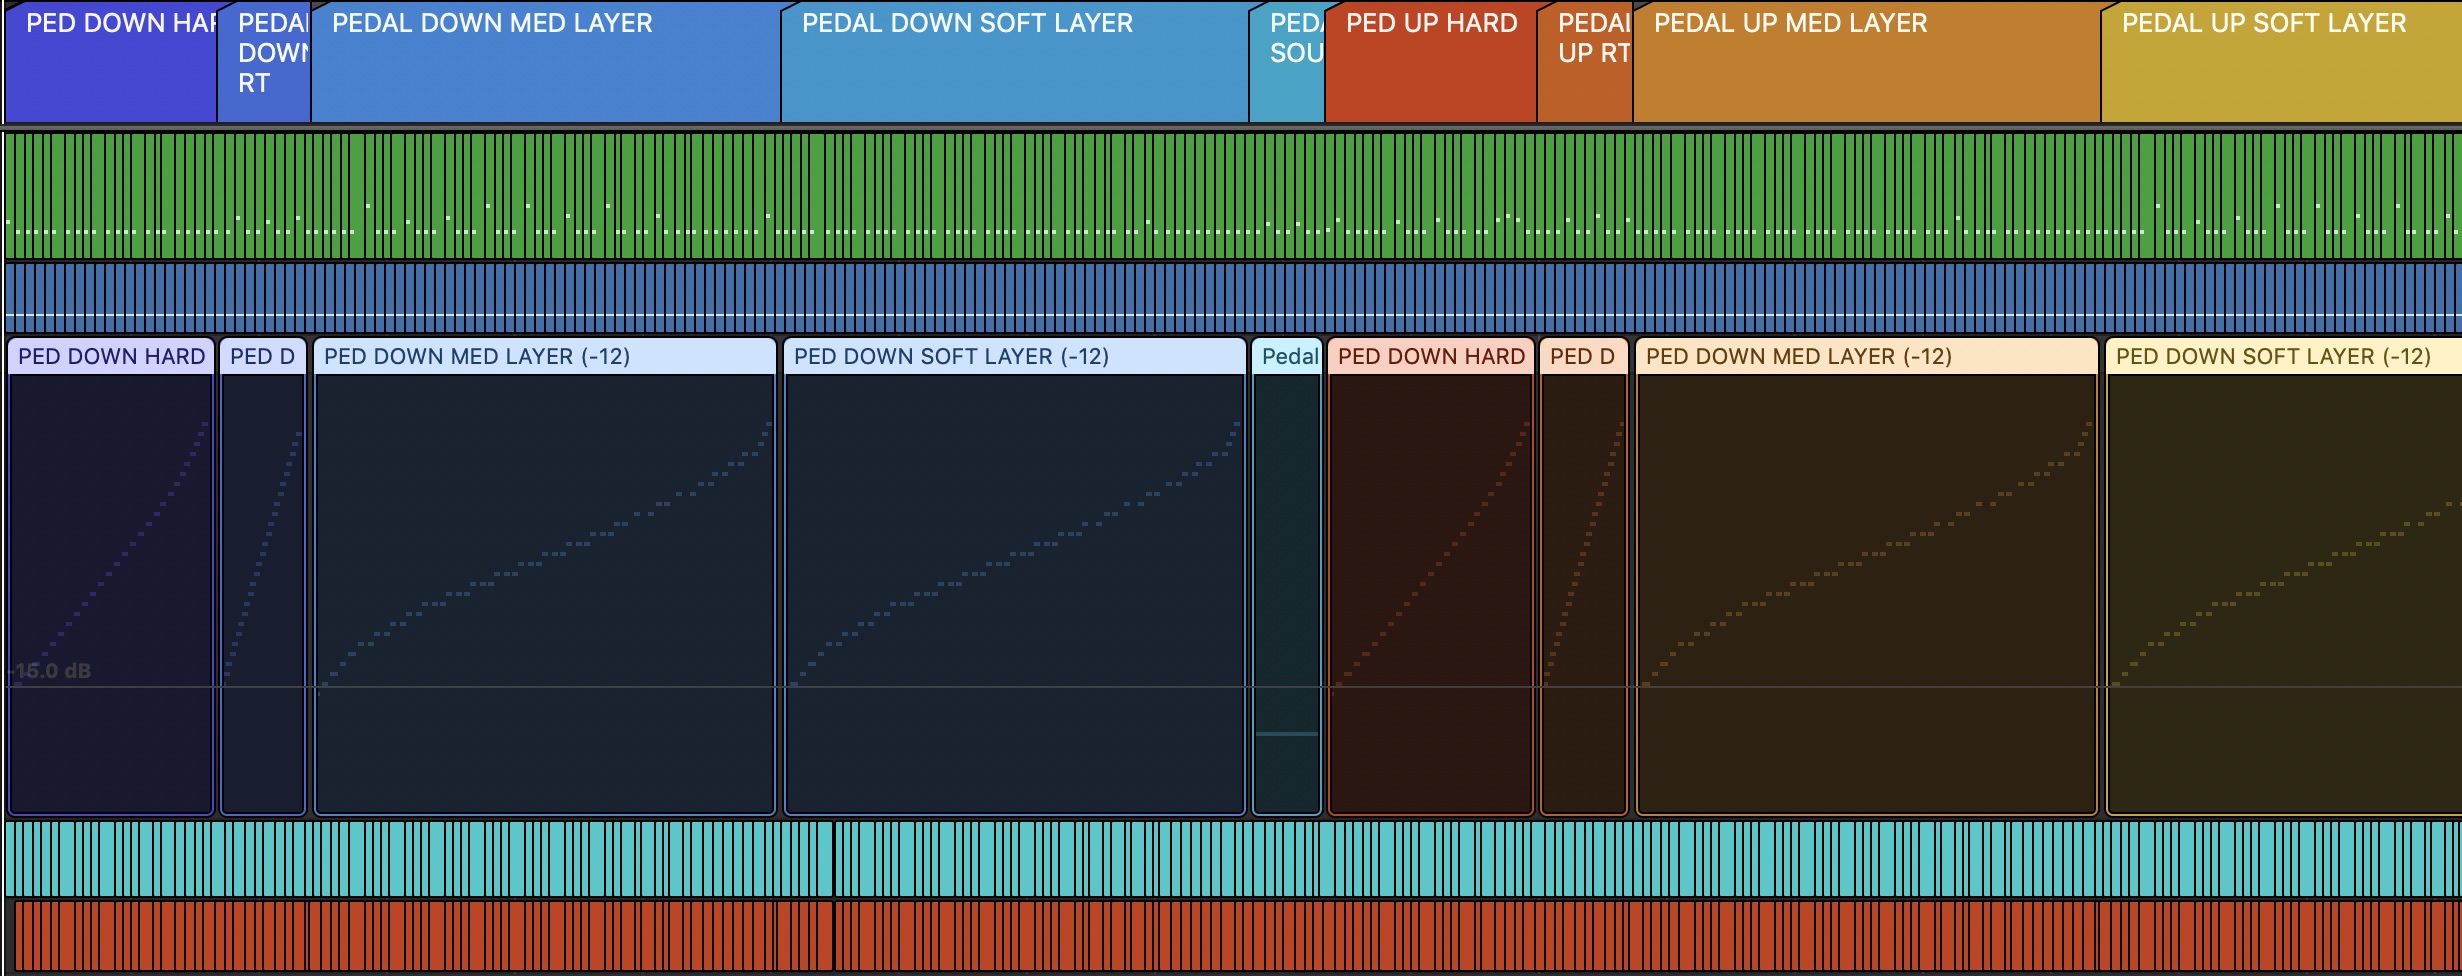
Here is a picture of a section of a monolith file opened in iZotope RX
The monolith structure walks through notes of regular intervals, for example a cycle of thirds: C – Eb – Gb – A – C.
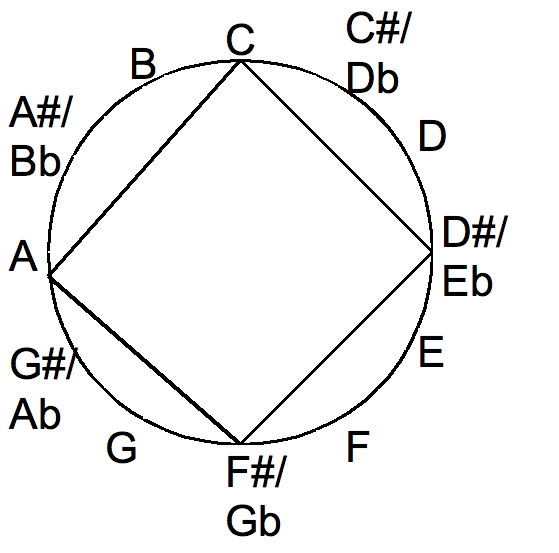
To make it simple to record these notes consistently we record to a click and play the note at the beginning of a bar in a 4/4 DAW project at a specific tempo/BPM.
The structure captures notes played at different volumes to use for different velocity layers in a virtual instrument. Capturing different volumes helps bring out the variations in the character of the instrument when play loud or soft.
We can create monolith systems for a range of instruments and depth of sampling (i.e. how much character/realism we want to capture). Sometimes you can capture all the character you want with very few samples and other times you want to capture a lot more detail to give you more versatility.
For a detailed recording of a piano, the monolith will contain the following in sequence:
- Pedal Down
- Loud Layer – cycle of minor thirds
- Release Triggers – cycle of minor thirds
- Medium Layer – cycle of minor thirds
- Soft Layer – cycle of minor thirds
- Pedal Sounds
- Pedal noise down
- Pedal noise up
- Pedal Up
- Loud Layer – cycle of minor thirds
- Release Triggers – cycle of minor thirds
- Medium Layer – cycle of minor thirds
- Soft Layer – cycle of minor thirds
The aim of this order is to allow for less detailed recordings to be made, for example to just record with pedal down loud layer, release triggers and medium layer (similar to the original MVP).
What is a Heat Map Sample?
A heat map is an optimisation to reduce the amount of time it takes to record an instrument. For a piano, there are a few things we can do to maximise the realism yet reduce the amount of time to record.
One optimisation is to reduce the number beats we hold down a note before releasing. Lower notes typically have a longer sustain than higher notes and so we need to capture more beats of a low note compared to a high one.

Another optimisation is to vary the number of round robins based on the velocity of the note (soft/medium/loud) and on the note pitch. It is typical that the loud layer is going to be triggered a lot less often than the soft and medium layers for most pianos and so you get quite a lot of variation by putting your effort into more round robins in the quieter layers.
Also, the playing style tends to effect the sonic quality of notes played towards the middle of the keyboard than the edges and so recording more round robins in notes closest to “middle C” and less towards the edges helps reduce the amount of time whilst still retaining the benefits of round robins.
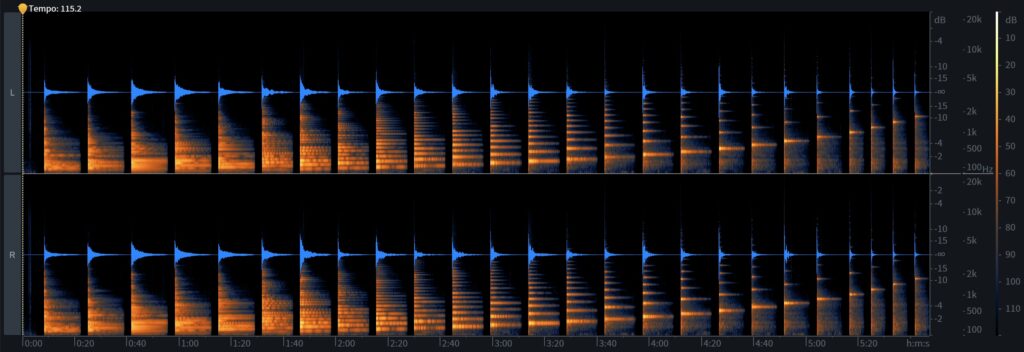
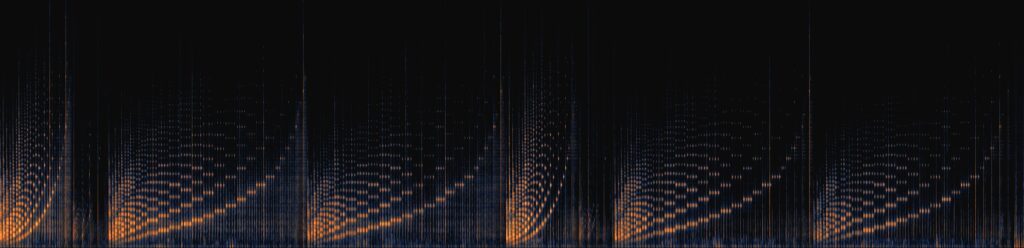
The following shows the pattern created by this heat map technique when viewing the resultant file in iZotope RX.
Another way to view the heat map monolith system is through the planner spreadsheet which you can view here.
How do I record a monolith?
To help record a monolith we have created a template project for Logic Pro (we hope to make templates for other DAWs – if you would like to make one please get in touch!).
You can download the latest Logic Pro template here.
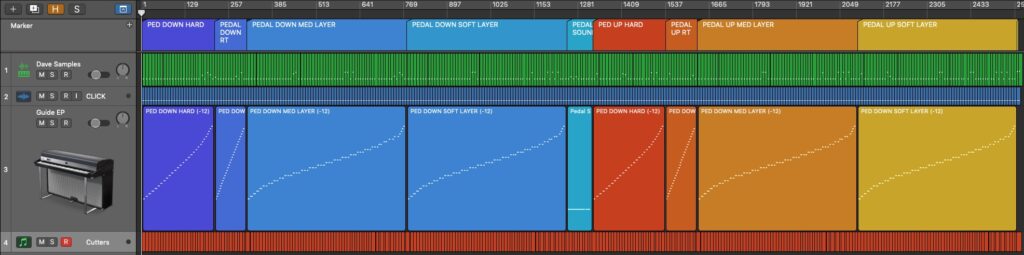
The template has a number of features to help you record
- Markers to show each of the layers we will record (with/without pedals, loud, medium, soft, release triggers and pedal noises).
- A “Dave Samples” guide track that provides prompts for what notes to play during recording.
- A CLICK track to help keep time (with EQ to help reduce headphone bleed when recording).
- A Guide EP track to help hear the notes to be sampled
- Cutters to use for cutting up recordings during the editing phase.
To record with the template, simple add a track (or multiple tracks if you have multiple microphones), hit record, and follow the instructions.
How do I edit my samples?
Once the recording phase is complete it is recommended to noise reduce the recording. Without noise reduction you can easily get a build-up of noise as you play multiple notes.
One way to do this is to export the recording as a wav file, load that file into noise reduction software (for example iZotope RX), run through noise reduction, export that as another wav file then import that noise reduced file into Logic Pro, aligned to the start of the original recording.
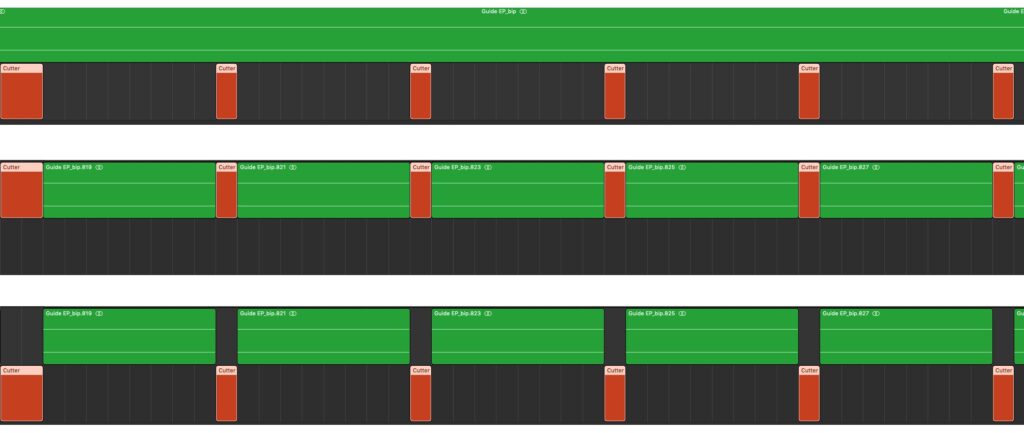
To create silence between the recordings, select all the regions in the “Cutters” track (by clicking the track name). Drag those cutter over the audio track and then drag the back down to leave gaps as below.
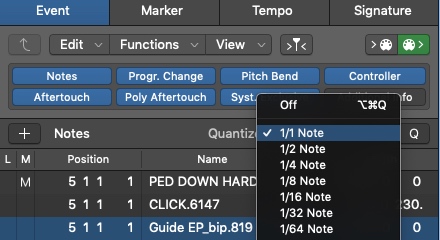
With the sections cut up, you may wish to adjust the starts of each region to ensure that you have the full audio sample, depending on how early or late the note was played. If you do adjust the starts, ensure you quantize them back to the grid by selecting all the regions, opening the event list and selecting the quantize option of “1/1 Note”.
Next, it advisable to smooth out the start and end of each region by adjusting the “Fade In” and “Fade Out” properties. To do this, select all the regions and use the Region properties tab. You may wish to use a curve to give a more natural fade.

Once you have done this you can bounce the track in place and export your monolith as a wav file (24bit / 48 kHz) and you are ready to try it out!
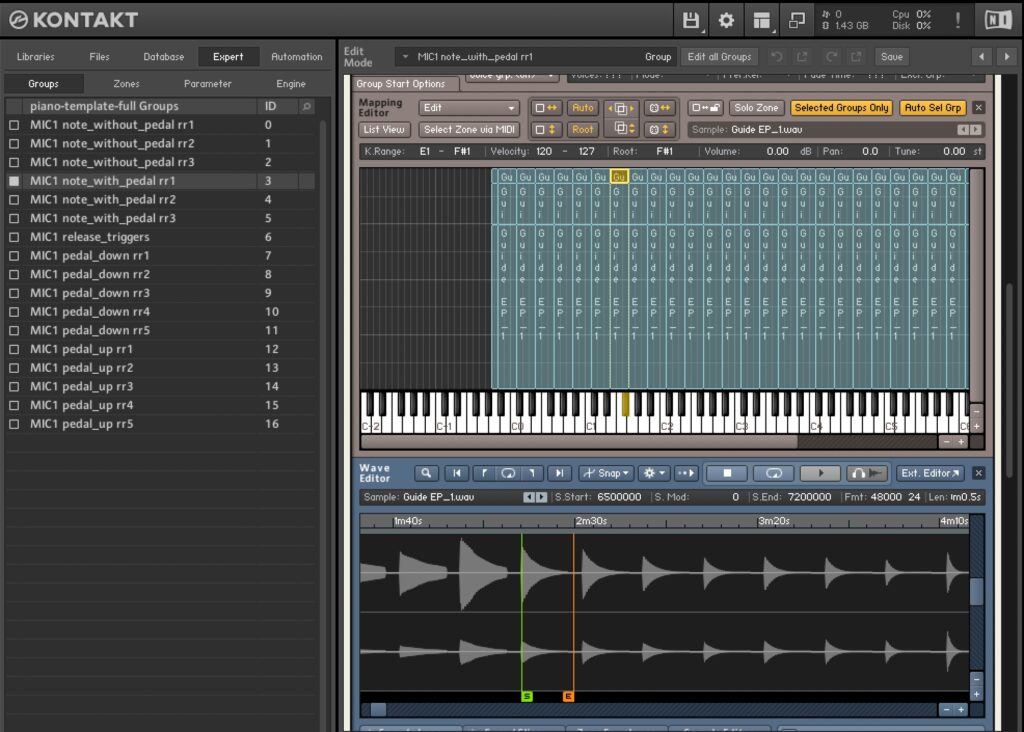
How do I load my samples into Kontakt?
Having created single wav file from the editing phase you can load directly into Kontakt.
You can download the latest Kontakt, SFZ and DecentSampler template here.
Copy your monolith file into the samples directory. Load the piano-full-template.nki file into Kontakt 6. You will be prompted that a file is missing (DOES_NOT_EXIST.wav).
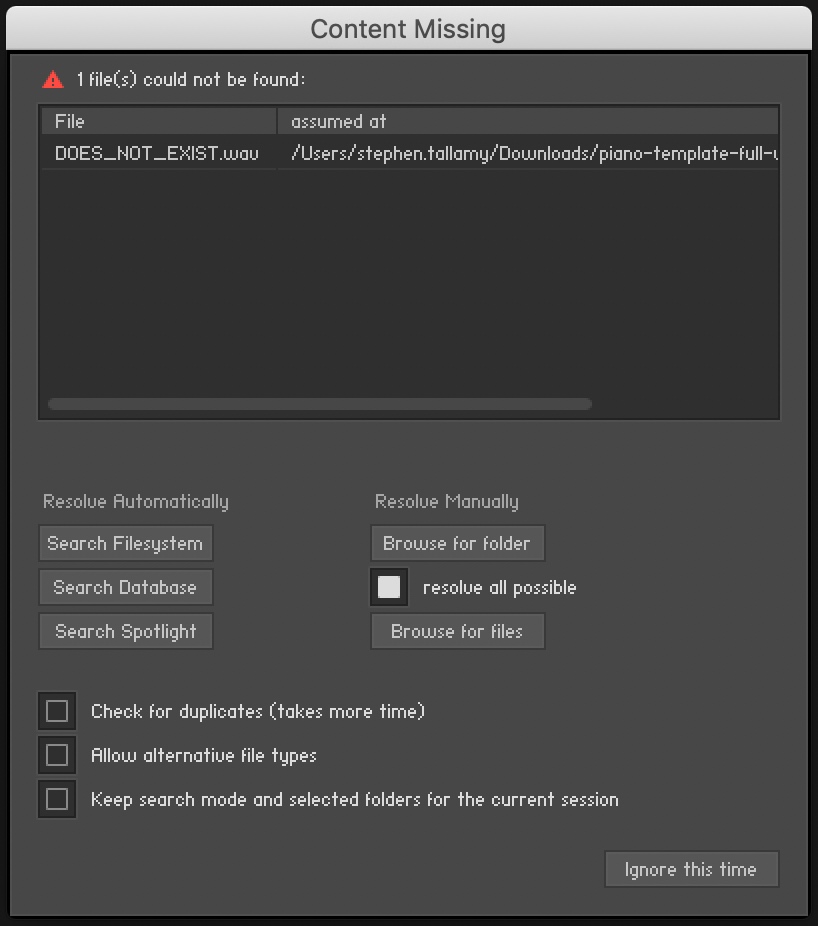
Click the “Browse for files” button and find the location of your monolith file. Once loaded you should be able to simply play the instrument.
If you want to look into more detail, click the cog icon. By selecting different groups you can select regions, zoom in and see the in and out points for each note.
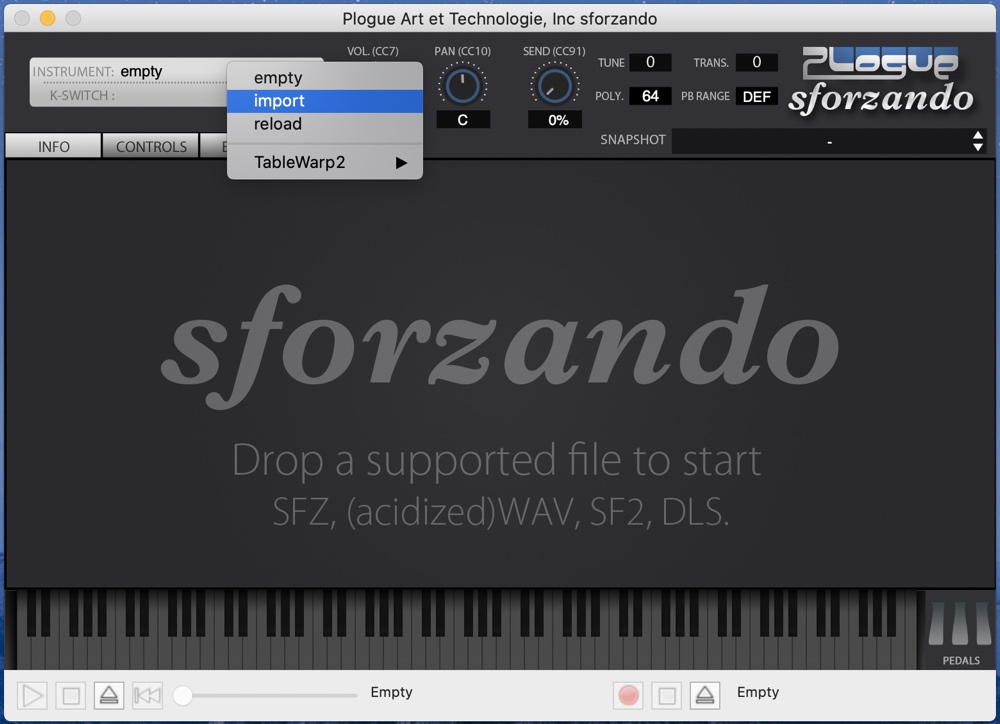
How do I load my samples into SFZ?
Having created single wav file from the editing phase you can load it into an SFZ compatible player (e.g. sforzando).
You can download the latest Kontakt, SFZ and DecentSampler template here.
Within that template you will find a file piano-template-full.sfz (which you can rename). To use this file with your monolith, open it up in a text editor and find and replace all occurrences of samples/DOES_NOT_EXIST.wav with the path to your sample file.
When you are complete, save the file and then simply load/import it into your SFZ player (example below with sforzando).
How do I load my samples into DecentSampler?
Having created single wav file from the editing phase you can load it into DecentSampler.
You can download the latest Kontakt, SFZ and DecentSampler template here.
Within that template you will find a file piano-template-full.dspreset (which you can rename). To use this file with your monolith, open it up in a text editor and find and replace all occurrences of samples/DOES_NOT_EXIST.wav with the path to your sample file.
When you are complete, save the file and then put the dspreset file and all your samples into your DecentSampler samples directory. You can set this path by clicking FILE… and then Preferences…

Alternatively, you can load the dspreset file directory using FILE… and then Load…