Fairy Choir
Designed to accompany my 'Fairy Piano', this is almost a 'Not A Choir', and it nearly got called that!

The story
This is not a conventional choir sound, although it has a lot of choir-like characteristics. This was recorded using a Souft-Weir AMC22 virtualised microphone from a Vai-Tahl synthetic sound source under the supervision of 9 Graces, a custom imaginary Systems-oriented producer, using the amazing sound space at 71F Studios in Suffolk, UK. Custom non plug-ins were used to process the audio in an audacious way. Everything (and anything else) that you hear and read here may or may not be not real or true in any truly meaningful way.
The Sounds – – – – –
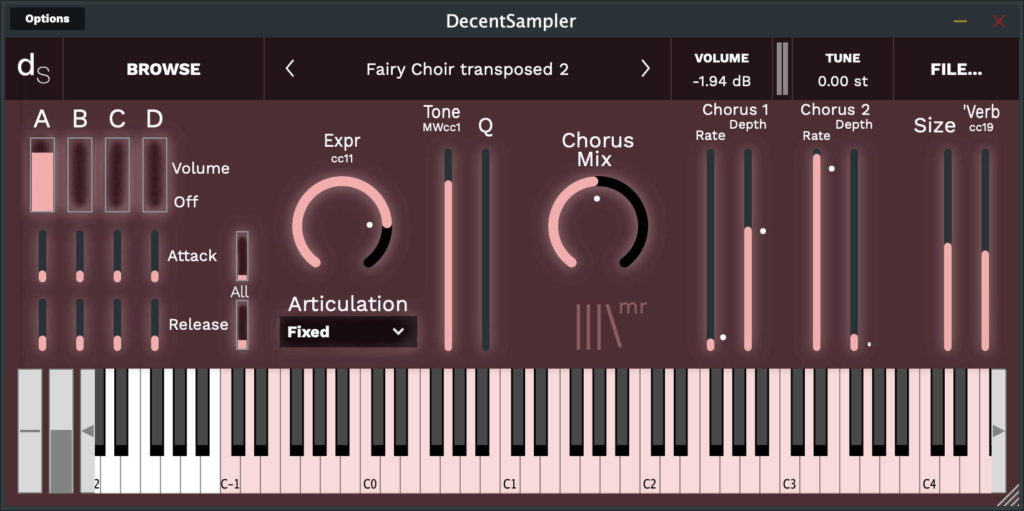
On the far left hand side there are four boxes, with two pairs of fours sliders underneath them. Ordinarily, in my instruments, these would be ‘mic’ sliders for four different sounds – but not in this case. These four boxes control the volume of four different processes applied to the same sound. If you move the slider to the lowest (bottom) edge of the box, then the volume of that process will be zero. This is a neat UI innovation that removes any need to have little menu boxes that pop-up with ‘On/Off’ labels – this significantly reduces the number of clicks and drags that are required to reduce the volume of a process to zero! The processes include various guitar-oriented effects like distortion, overload, non-linear amplification and more. . If you drag upwards in one of the little boxes then a pink rectangle will appear. Drag it as much of the way up as you wish – higher will just make the output louder!
There are four different processes. Each has four dynamic/velocity layers, and 3 round-robins. The distortion/overdrive/non-linear-amplificiation varies for each process, so the response to MIDI velocity can be very different. In addition, the ‘Articulation’ menu can affect the mapping of velocity to the processing. You really don’t need to know what is happening in A, B, C, or D, and you should use your ears to audition them individually, in combination, and in context with your intended usage. It is all about context, as you already know, and if you didn’t then you do know now!
As the words ‘guitar’ and ‘distortion’ may have given away, these aren’t clean, flawless sounds. There’s a lot of resonance, some grit, some unwanted artefacts, and it might almost be analogue if it wasn’t digital…
The four ‘mic’ sliders can be used as a mixer for the processes, so you can mix the processes as you will. There is no need to set the ‘mic’ sliders to full – this just makes the output louder!
The Not Envelopes – – – – –
Underneath the four ‘mic’ sliders boxes are two pairs of sliders, plus two additional boxes over to the right (labelled as ‘All’). The four sliders in each pair control the Attack or Release of the process ‘mic’ slider vertically above it. So you have individual control of the time that which each process takes to start (fade in) and stop (fade out). Fairy Choir is influenced by Systems Music, and so the times can be very long (60 seconds – but you could edit the XML to make it longer if you wish. Please note that just wishing on its own will not accomplish this – you need to edit the XML.)
To speed up setting all of the Attack and Release slider times, then there are two small boxes to the right of the sliders. The change all the sliders at once – hence the ‘All’ label. Note that having the same time for all of the processes is very boring and very predictable, and doesn’t sound optimal in any way. Different values for the Attack and Release time for each process is thoroughly recommended. Oh, and you don’t need to have all the processes running at once! But you do need to have at least one of those ‘mic’ sliders for the A, B, C, and D processes raised above the ‘Off’ position in order to get some sound. In the spirit of Systems Music, then the silence that you get from an ‘All Off’ setup is also available as a sound source for just over 4 minutes…
The Controls – – – – –
The rest of the controls start from the Expression rotary control. Taking them from left to right…
First, the Expression control, which is mapped to MIDI CC 11, gives you a vertical slider that controls the output volume of Decent Sampler. This is how you control the volume or loudness, of the sound!
Underneath the Expression rotary control is the ‘Articulation’ menu. This provides 9 different ways that MIDI notes can be allocated to the sound generation functionality inside Decent Sampler.
– Fixed, Parallel and Inverse do not have any transpositions, randomisation, or spatialisation operations applied to them. Inverse deliberately reverses the dynamics in the velocity layers.
– Transpose 1, 2 and 3 have transpositions applied using 3 round-robins. These are pure cyclic round-robins, and so the results are repeatable.
– Magic I, II and III have transpositions, randomisation, spatialisation and detuning operations applied to them. These use random allocation, although repeats are not allowed. The results are not repeatable.
The Transpose and Magic processes can be used with arpeggiators or sequencers to provide variations that either repeat (Transpose) or are random (Magic).
(If anyone is interested, the Articulation is the main reason why this Decent Sampler instrument has over 1100 lines of XML (not my longest!).)
Next, the Tone slider controls the cut-off frequency of a 4-pole low-pass filter: high is open, letting all frequencies through, low is closed, letting only low frequencies through – the Tone control is mapped to MIDI CC 1: the Mod Wheel the grey bar next to the virtual keyboard. The Q’ slider sets how resonant the filter is – at zero it is flat and boring, at 1 it is kind of peaky, but it isn’t the resonant 24 dB/Octave timbre-twister that you associate with analogue synthesisers. Don’t be afraid to try moving the Low-Pass Filter and Q sliders around – there is a lot of control over the timbre available! The sounds from the ‘mic’ sliders are deliberately bright, so you can cull harmonics using the Tone controls. Have no mercy – filter those frequencies like it’s 1999…
(Yes, I do know that Decent Sampler only has a 2-pole filter built-in. Who says that you can’t break the rules?)
The big rotary ‘Chorus Mix’ slider controls the Dry/Wet mix of the Chorus effects, which are next… Note that the guide dot is half-way – this is because the best position is when the wet/dry mix is 50:50. But you can go all Wet if you wish.
The next area is two ‘Chorus’ effects in series. These makes it sound like the sound is detuned. Each section is identical, although the ‘guide’ dots show two very different settings. The Rate slider changes the speed of the wobbling of pitch. The ‘Depth’ slider controls the amount of pitch wobbling. Slow is probably your instinctive speed for the Rate of the chorus, but when using a step sequencer then you might find that faster rates are surprisingly interesting…
The little grey dots on the right of the sliders are there to remind you of the basic ‘home’ position – a mid-range setting that is probably a good starting point for exploration. If you get confused, then just set the sliders back to the dots and you should be back in control!
The final area on the right hand side has only two sliders. They control the Reverb effect… The ‘Size’ slider sets the size of the room that the reverb is emulating, whilst the ‘Wet’ controls is like the Delay ‘Wet’ slider, it only controls the amount of reverberated sound that you will hear. The dry sound is always audible. The ‘Wet’ slider is mapped to MIDI CC 19.
Presets – – – – –
Some of the reviews of my other Sample Packs said that there were too many controls, so despite a merciless cull, I have also included a few presets as examples of what can be produced using this Sample Pack.
MIDI Controllers – – – – –
1 ‘Modulation Wheel’ controls the Low-Pass Filter cut-off frequency = the ‘Tone’
11 ‘Expression’ controls the output volume
19 ‘General Purpose 4’ controls the Reverb Wet/Dry mix
V 1.0
UI Details
Interface
Reviews
Ethereal ambience
In case you are familiar with Martin's sampled instruments, this shares the same idea as most of them. If you are not familiar at all, the concept is that you get to have many different layers of sounds that you can fully control into a totally unique sound every time.
In this case, we have 4 base layers of sounds, with 9 "articulations" that they slightly randomize the user's input so you get an even more unique result every time. In the usually intimidating GUI, you will find Attack and Release settings for all layers individually, a filter, two chorus settings that you can mix together, and a nice lush reverb.
The result is a very ethereal ambient signature that gives you this spacey, almost sci-fi~ish feeling, but it's definitely not just for that. The 5+1 presets are enough to give you a good idea on what this instrument is capable of, but in my opinion, such design encourages the user to try to make their own unique patches.
As a minor thing, I found that the Release setting is overly sensitive, which means, a tiny addition brings a lot of release duration, but still everything is totally controllable.
Lovely
is what I would've said if I only read the title, now I didn't and I can say that lovely just got a whole new meaning!
It sounds nice but for whole chords if held down for a longer period of time they start to clip, sometimes even for a single note, which can be a bit annoying. Very cool ambient instrument anyways and a different twist to a choir.
Very nice GUI as well, but I've learned to expect that from you :P