SWooh-arrMR3
Slow pads, dreamy evolutions and crazy-long release times - made for the June Discord LABS Afrorack Challenge Competition Contest... Updated to V1.3 after Alex's review...

The story
SWooh-arrMR3, for the June 2022 Discord Challenge
This is based on SWooh-arrMR, but with different samples (20 samples), two velocity layers, and a few tweaks to the internal algorithms in the menu.
Although it might look like this is jumping on the Global Swarm meme, it’s actually something that I’ve been thinking about in the background for quite a while, and there are bits and pieces of Swooh-arrMR3 in some of my earlier releases – I’ve previously revealed that I gradually work towards end results in small steps, rather than giant leaps…
Swooh-arrMR3 is a ‘Slow Swarm Generator’, although it also veers deep into ‘Pad’ territory. It mixes bits of ‘Drone Drone’ and ’Straight Maths’ (think of a Roland Synth…) to give something rather different as the result. Like ‘Drone Drone’, the idea is to play notes slowly and deliberately for an effect to emerge, rather than the ‘play as many keys as possible as fast as possible’ technique which is sometimes seen as impressive.
The source material
The samples used here are from the supplied Afrorack sample set. I used only one sample as the basis for all of the derived samples used in this virtual instrument: 07 Afrorack 240522 – Eurorack Morph Sound 1. There is plenty of sonic material in the source material for many more sample packs, and these may well appear in future SWooh-arrMR releases.
The ’07 Afrorack 240522 – Eurorack Morph Sound 1′ was auditioned in Audacity, and five candidate sections were chosen. Although the sound is showcasing morphing, I deliberately chose selections where the timbral variation was subtle rather than explicit. The recordings were normalised, high-pass filtered, and trimmed. Various custom filters were then applied to the recordings, resulting in four outputs: two ‘Main’ outputs containing harmonic material separated by one octave, and two ‘Residual’ outputs that contained the material rejected by the first filters. I have always wondered why people use filters to remove parts of the audio spectrum, and never use all of that sonic raw material – if this was film, then those off-cuts and out-takes would potentially be very valuable. So that’s four samples derived from each of the five source sections, giving 20 samples in all.
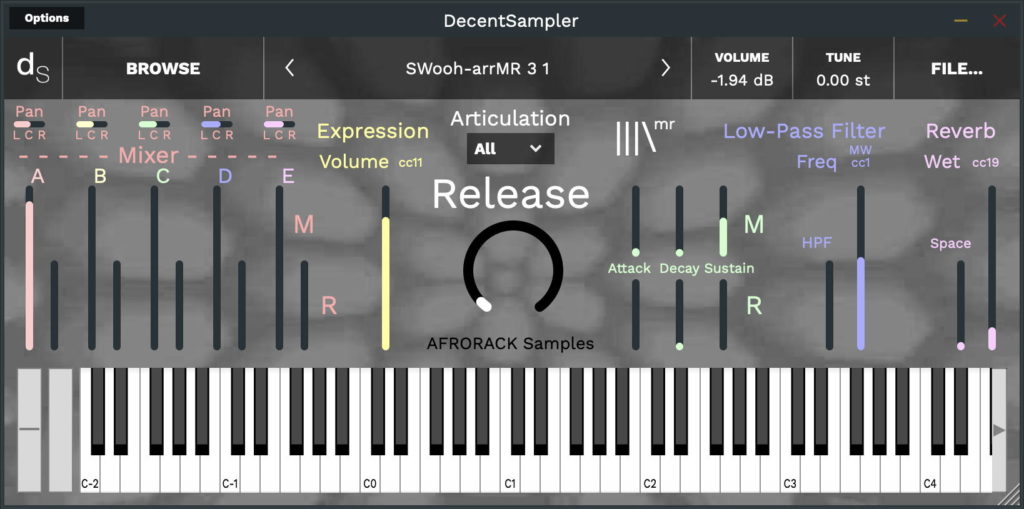
The sound sliders: A, B, C, D, and E
There are 5 ‘mic’ sliders, which are effectively a sub-mixer that lets you set your favourite mix of the samples and their positions in the stereo field. Like many of my previous virtual instruments, Swooh-arrMR3 uses stereo samples, and lets you set their pan positions, so you have some control, over the placement of sounds across the stereo stage, although there are mildly different sounds in the left and right channel. The samples are all of different lengths (deliberately, of course!), and they are all looped. I also cheated big-time with the round-robins by just detuning individual samples (Previously, one reviewer noted, with what some might interpret as alarm, that my instruments had different beat times between the same intervals, every time you played two notes – which I took as praise!) The sliders are faintly coloured in rainbow colours because it makes it obvious that they are different things, almost like the A, B , C, D, and E letters above them. The ‘tall’ ‘mic’ sliders control the Main samples, but they also have smaller sliders next to them, which control the Residual samples. M means Main, and R means Residual, in the Mixer labelling.
Yep, it’s a mixer! Move sliders A, B, C D, E and/or F, or any combination, upwards and you will get a mix of up to 12 timbres. The exact sounds that you will get will depend on the settings of the ‘Articulation’ menu, but that’s for later. For now, just hold down a note and adjust the sliders until you get a sound that you like. This is also a good time to set the pan controls, which slide to the left and right for each of the A, B , C, D, and E sounds and so set where the sounds are in the stereo image. In the centre will be boring. To the side will be more interesting, but will not have as focussed a position in your stereo field, and so will upset mixing gurus.
Remember that the sources of the Main (tall sliders) and Residual (short sliders) are different: Main samples are harmonic (and the main source of the ‘pitched’ output of this instrument), whereas Residual samples are not harmonically connected to the pitch sounds from the Main sliders – in other words, they are ‘filler’ or ‘noise’ timbres, which can be used to add ‘character’ or ‘roughness’ to the output. Because of this role, and to protect you from yourself, I have restricted the volume of the Residual (R) sliders so they don’t get very loud.
Before you spend too long on setting up the sliders and the pan controls, don’t forget that Decent Sampler’s stereo chorus effect and reverb do blur the timbres and their associated stereo image, so you need to centre the pan controls and use outboard effects if you want more control over stereo imaging. It’s a bit like mastering – will anyone ever hear those reversed vocals? Actually, they might! But don’t do the ‘three years to get the second single perfect’ thing, because that’s not compatible with today’s Ify Spot ‘release as fast as you can, as often as you can, so you make me richer’ ethos where you never seem to make any money at all…
The ten sounds are just two-level velocity layered samples stretched across the keyboard. In the past I have used various algorithmic approaches to synthesise different velocity layers, but this does not seem to have elicited very much response, presumably because it isn’t obvious that anything difficult or unusual has been used. I will see if I can extend the technique further in future releases…
– – – – –
Here are some notes on how it works, and how you can use it.
The User Interface UI may look scary and complex at first, but don’t panic! (Well, actually, you CAN panic because I’m not going to force you to do anything, but when you have calmed down, then come back here and continue reading.)
Lets break it down into sections:
Left-hand panel
On the left of my logo, there are 5 tall vertical Main ‘mic’ sliders for the 5 sound sources – see the ‘Sound sliders’ section above for more details. I called them A, B, C, D, and E, which is simple and slightly mysterious, and then I went and ruined the surprise by describing their content in the section above!
The ‘shorter’ Residual ‘mic’ sliders to the right of each Main slider are just there to add a little bit of noise/fill/character/inharmonics to the timbre. This is the exact opposite to the ‘Subtractive’ synthesis method that is so widely used – but the word ‘Additive’ is already used for building up sounds using sine waves (or square waves in Walsh Additive, but that’s another story, and yes, there are other ways… Solitons are rather cool…), and so in the absence of any authorised or commonly-used name, I’m going to coin ‘Rough Synthesis’ for various reasons, including a play-on-words, but you will need to look at published AES papers to understand the reference.
Using multiple ‘mic’ sliders can stress Decent Sampler’s polyphony under some circumstances, so don’t automatically set all the 12 ‘mic’ sliders to maximum in the assumption that this is the best or optimal sound. Instead, try using only one or two sliders at once (less is more), and remember that you have control over low frequencies with the High-Pass Filter (HPF) as well as high frequencies with the Low-Pass Filter. Of course, just to confuse you, because using lots of sliders with different pan positions can sound really cool! So, use ‘some’ of the available sliders, is that clear enough?
Right-hand panel
To the right of the mixer, there is the ‘processing’ section, which I have simplified, honest!
From the left to the right:
First, the Expression control, which is mapped to MIDI CC 11, gives you a vertical slider that controls the output volume of Decent Sampler. This is how you control the volume or loudness, of the sound!
The big round control in the centre, the ‘Release’ rotary control, sets the Release time – how long it takes for the sound to fade away after you stop holding keys down. In this application, the Release time can be very long – up to two minutes if you want. To the right, is a tiny slider that says ‘(Attack)’ at the end of some explanatory text – basically this sets the rate at which notes get louder when you first hold a key down. So the sound gets louder at the rate set by the attack time, then it stays at the maximum (sustain) level, and it stays at the sustain level until the key is released, and then it fades away at the release time rate. Fade in, hold, and fade out. You’ve probably seen Christian Henson do exactly that with his Doepfer master keyboard…
Oh, yes, and there’s also that ‘Articulation’ menu that was mentioned earlier. It is just above the big ‘Release’ rotary control. This has three options: All (the default), Arp and Magic.
All – this just adds a bit of detuning – use this for slow builds and drones.
Arp – this uses the round-robins to arpeggiate octaves.
Magic – this throws detuning and random octaves into the mix. Best with sequenced material.
The next area is two envelopes to accompany the big ‘Release’ rotary control. These are made up of ‘not so tall’ sliders that are used to control the Attack and Decay times of the Main samples, or the Residual samples, as well as the Sustain level here the Main or Residuals will end up if you hold the keys down. Most as in the Mixer section, the Main sliders are on the top, whilst the Residual slider is on the bottom. Generally, the Main attack time is short (near the bottom), whilst the Residual attack time is longer (higher, up, half way or above), but don’t let that constrain you!
The next area has one small slider and two big sliders. The small HPF slider is a High-Pass filter, and this removes low frequencies from the sound, making it thin in timbre, and for lower pitched notes, even removing the fundamental. Most of the time, this can be set to the 0 (lowest) position – but experiment! The LPF (Low Pass filter) slider controls the cut-off frequency of a 2-pole low-pass filter high is open, letting all frequencies through, low is closed, letting only low frequencies through – the Tone control is mapped to MIDI CC 1: the Mod Wheel the grey bar next to the virtual keyboard. There isn’t a Q’ slider in this ‘simplified’ implementation. Don’t be afraid to try moving the HPF and Low-Pass Filter sliders around – there is a lot of control over the timbre available! The sounds from the source sliders are deliberately bright, so that you can cull harmonics using the HPF and the LPF controls. Have no mercy – filter those frequencies like it’s 1999…
The final area has only two sliders. They control the Reverb effect. The ‘Space’ slider wobbles the pitch of sounds in the room that the reverb is emulating, whilst the ‘Wet’ slider controls controls the amount of reverberated sound that you will hear. The dry sound is always audible. The ‘Wet’ slider is mapped to MIDI CC 19. I over-use reverb, so your job is to reduce it! (Ever wondered why so many factory sounds have too much reverb on them?)
Presets
My user interfaces (UI) are scary for some people, so I have included a few presets. The names might give some hazy pointers to the type of sound, but this can be very subjective… One of my recent faves was ‘Angry Insects’…
UI
There is no need to be intimidated by all the sliders – just concentrate on one of the areas at once and you should be fine. There is always that big round ‘Release’ control – no connection to the Spitfire UI at all – that will help you to release the sounds from this virtual instrument!
As you can see, I’m exploring making my interfaces simpler, just as more complex interfaces seem to be more popular. Life is like that: some people are just out of step with the universe.
The sounds…
SWooh-arrMR3 is an atmospheric swarm/pad generator. Use it to build tension before a break or a cue. Use it as an unsettling, busy pad without the cliches of violinists who have been drinking too much Red Bull, or of fast synth arpeggios. Use it in YOUR way, and invent a new cliche!
Because of the source of the samples, SWooh-arrMR3 has a very different character from 1 and 2. It is very ‘evolving’ – try holding some keys down and see what happens…
MIDI Controllers
1 ‘Modulation Wheel’ controls the Low-pass Filter Cut-off Frequency, the ‘Tone’
11 ‘Expression’ controls the output volume
19 ‘General Purpose 4’ controls the Reverb Wet/Dry mix
The video below shows how some bits of the user interface works, although it uses a very different instrument as an example. One day I may make a different video that is better suited to my latest controls…
V1.3
UI Video
Interface
Reviews
An incredible bundle of majestic sounds
Martin has managed to create another extremely versatile set of patches that is able to produce a huge array of different sounds. From majestic shimmers to an ethereal piano - the customization options are simply insane.
The articulations, combined with all the layer settings make this an extremely versatile instrument that may initially seem overwhelming. Don't worry though because, as always, Martin has got your back, as he has kindly and carefuly put 11+1 presets for the user to run and have an amazing sound with a single click. Out of all those, my favourite has to be the Soft Barrel, with the Whispiano being a close second.
Side note: Even after placing the files to an M.2 drive, I start getting a minor clicky noise on the attack of each note after playing a few notes. The noise disappears if I stop playing for a second, but appears after a few notes again. I noticed that the patches use slightly more CPU than other DS patches, but it just might be a problem on my end.
Lovely Pad Combinations
The pads created for this library sit well together, and the complex GUI allows them to be blended together. I wonder if there could be more variance between the pads (different octaves, more distortion etc.) that helps differentiate between the two. There also appears to be a bug with the pan, with the panner's not corresponding to the same coloured sliders below. The reverb effect also seems to over-ride the pan, but this cold be a DS bug rather than an issue with this pack.
Overall the samples included are really solid, and the detailed GUI gives a great choice of further options to shape the sounds- well done!