SWooh-arrMR2
More springiness than anyone could ever need...

The story
This is SWooh-arrMR1, but with different samples (6 instead of 4 ‘mic’ sliders), three velocity layers, and a few tweaks to the internal algorithms in the menu.
Although it might look like this is jumping on the Global Swarm meme, it’s actually something that I’ve been thinking about in the background for quite a while, and there are bits and pieces of Swooh-arrMR2 in some of my earlier releases – I’ve previously revealed that I gradually work towards end results in small steps, rather than giant leaps…
Swooh-arrMR2 is a ‘Swarm Generator’. It mixes bits of ‘Drone Drone’ and ’Straight Maths’ (think of a Roland Synth…) to give something rather different as the result. Like ‘Drone Drone’, the idea is to play notes slowly and deliberately for an effect to emerge, rather than the ‘play as many keys as possible as fast as possible’ technique which is sometimes seen as impressive.
The source material
The samples used here are from my Global Swarm submission, but adjusted here and there, and just on their own! The source material was a wooden box with a mechanical multi-spring reverberator inside it, and a mechanical beater made form a 5V fan motor, some springs, and three of the plastic balls from roll-on deodorant casings. I have used mechanical reverberators for many years, and this one has a carefully tuned broad spread of resonant frequencies, so it doesn’t have the strong resonance of a traditional spring reverb as you might find inside a guitar amplifier. The recording was made using a technique not a million miles away from the one that was used to bug the American Embassy in Moscow back in the Cold War, but adapted to modern technology. If you look at the video for my Global Swarm submission, you won’t see a microphone, and this is why – it isn’t visible for a reason. I did play around with a laser ‘remote listening’ device as well, but the Signal-to-Noise ratio isn’t very good on that, although I suspect that high end devices might be better.
The recordings were then comb filtered to remove non-C related frequencies. The beauty of comb-filters is that they ‘leak’ a little, and so you don’t lose all of the character of the source material – in this case, the springs. You really can hear the springs in the samples, although since most people don’t generally play about with tuned springs very much, it is an unfamiliar sound which perfectly suits this application. Swarms of mechanical reverberators are rare, in my experience, but this virtual instrument gives you a lot of them in a relatively easy to use device.
I did consider removing the usual reverb that Decent Sampler provides, and decided in the end that the contrast between mechanical reverb and digital reverb was so striking that it was quite distinctive.
The sound sliders: A, B, C, D, E and F
There are 6 ‘mic’ sliders, which are effectively a sub-mixer that lets you set your favourite mix of four samples and their positions in the stereo field. Unlike some previous virtual instruments, Swooh-arrMR2 uses mono samples, and lets you set their pan positions, so there’s no wildly different sounds in the left and right channel, as might have happened earlier in an other virtual instrument or two… The samples are all of different lengths (deliberately, of course!), and they are all looped. I also cheated big-time with the round-robins by just detuning individual samples (Previously, one reviewer noted, with what some might interpret as alarm, that my instruments had different beat times between the same intervals, every time you played two notes – which I took as praise!) The sliders are faintly coloured in rainbow colours (well, five of the set, anyway, (plus White because I couldn’t quickly work put the hex values for an evenly spaced set of six colours from the colour spectrum)) because it makes it obvious that they are different things, almost like the A, B , C, D, E and F letters above them. The ‘mic’ slider follow Christian’s instructions in pairs, so A and B are slow hits of the box, mostly done manually with a marker pen. C and D are faster hits, made using the beater at the slowest speed. E and F are also produced using the rotary beater, on the faster practicable speed.
So, it’s a mixer! Move sliders A, B, C D, E and/or F, or any combination, upwards and you will get a mix of up to six timbres. The exact sounds that you will get will depend on the settings of the ‘Articulation’ menu, but that’s for later. For now, just hold down a note and adjust the sliders until you get a sound that you like. This is also a good time to set the pan controls, which slide to the left and right for each of the A, B , C, D, E and F sounds and so set where the sounds are in the stereo image. In the centre will be boring. To the side will be more interesting, but will not have as focussed a position in your stereo field, and so will upset mixing gurus.
Before you spend too long on setting up the sliders and the pan controls, don’t forget that Decent Sampler’s stereo chorus effect and reverb do blur the timbres and their associated stereo image, so you need to centre the pan controls and use outboard effects if you want more control over stereo imaging. It’s a bit like mastering – will anyone ever hear those reversed vocals? Actually, they might! But don’t do the ‘three years to get the second single perfect’ thing, because that’s not compatible with today’s Ify Spot ‘release as fast as you can, as often as you can, so you make me richer’ ethos where you never seem to make any money at all…
The six sounds are just three level velocity layered samples stretched across the keyboard. The low velocity sound is generally less frenetic, while the high velocity sound tends to include a lot of spring artefacts. Playing at low velocities with the low-pass filter cutoff set low will give a sound whose origins may be less than obvious.
– – – – –
Here are some notes on how it works, and how you can use it.
The User Interface UI may look scary and complex at first, but don’t panic! (Well, actually, you CAN panic because I’m not going to force you to do anything, but when you have calmed down, then come back here and continue reading.)
Lets break it down into sections:
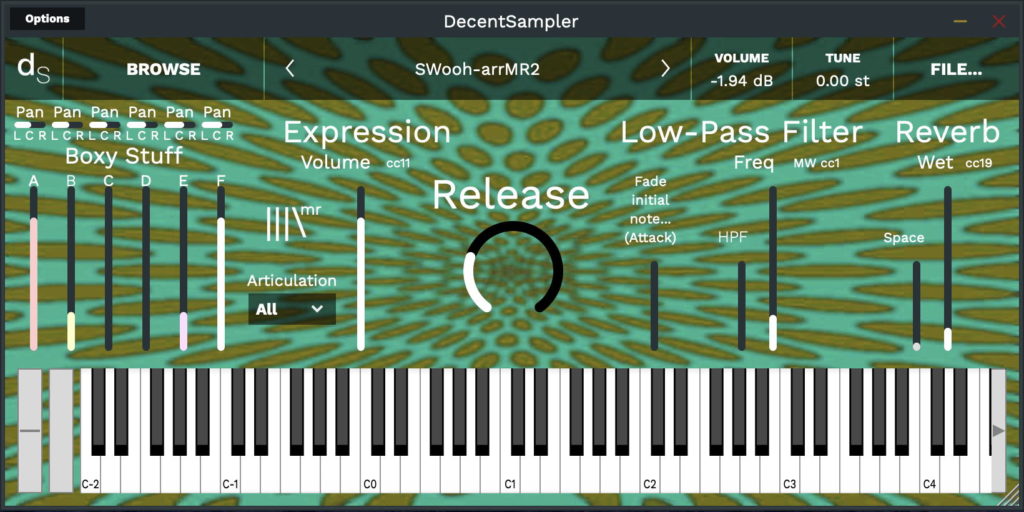
Left-hand panel
On the left of my logo, there are 6 vertical ‘mic’ sliders for the 4 sound sources – see the ‘Sound sliders’ section above for more details. I called them A, B, C, D, E and F, which is simple and slightly mysterious, and then I went and ruined the surprise by describing their content in the section above!
Using multiple ‘mic’ sliders can stress Decent Sampler’s polyphony under some circumstances, so don’t automatically set all the 6 ‘mic’ sliders to maximum in the assumption that this is the best or optimal sound. Instead, try using only one or two sliders at once (less is more), and remember that you have control over low frequencies with the High-Pass Filter (HPF) as well as high frequencies with the Low-Pass Filter. Of course, just to confuse you, because using up to sliders with different pan positions sounds really cool! So do, or don’t, use six sliders, is that clear enough?
Oh, yes, and there’s also that ‘Articulation’ menu that was mentioned earlier. It is just underneath my logo for PBCU. This has three options: All (the default), Sparse and Thin.
All – this throws multiple octaves AND detuning into the ring – use this for slow builds and drones.
Sparse – this has multiple octaves and spreads them out with round-robins.
Thin – this has neither the inverse round-robins, nor the multiple octaves, and so sounds thin – which is good for busier playing.
Right-hand panel
To the right of my logo, there is the ‘processing’ section, which I have simplified, honest!
From the left to the right:
First, the Expression control, which is mapped to MIDI CC 11, gives you a vertical slider that controls the output volume of Decent Sampler. This is how you control the volume or loudness, of the sound!
The big round control in the centre, the ‘Release’ rotary control, sets the Release time – how long it takes for the sound to fade away after you stop holding keys down. In this application, the Release time can be very long – up to two minutes if you want. To the right, is a tiny slider that says ‘(Attack)’ at the end of some explanatory text – basically this sets the rate at which notes get louder when you first hold a key down. So the sound gets louder at the rate set by the attack time, then it stays at the maximum (sustain) level, and it stays at the sustain level until the key is released, and then it fades away at the release time rate. Fade in, hold, and fade out. You’ve probably seen Christian Henson do exactly that with his Doepfer master keyboard…
The next area has one small slider and two big sliders. The small HPF slider is a High-Pass filter, and this removes low frequencies from the sound, making it thin in timbre, and for lower pitched notes, even removing the fundamental. Most of the time, this can be set to the 0 (lowest) position – but experiment! The LPF (Low Pass filter) slider controls the cut-off frequency of a 2-pole low-pass filter high is open, letting all frequencies through, low is closed, letting only low frequencies through – the Tone control is mapped to MIDI CC 1: the Mod Wheel the grey bar next to the virtual keyboard. There isn’t a Q’ slider in this ‘simplified’ implementation. Don’t be afraid to try moving the HPF and Low-Pass Filter sliders around – there is a lot of control over the timbre available! The sounds from the source sliders are deliberately bright, so that you can cull harmonics using the HPF and the LPF controls. Have no mercy – filter those frequencies like it’s 1999…
The final area has only two sliders. They control the Reverb effect. The ‘Space’ slider wobbles the pitch of sounds in the room that the reverb is emulating, whilst the ‘Wet’ slider controls controls the amount of reverberated sound that you will hear. The dry sound is always audible. The ‘Wet’ slider is mapped to MIDI CC 19. I over-use reverb, so your job is to reduce it! (Ever wondered why so many factory sounds have too much reverb on them?)
Presets
My user interfaces (UI) are scary for some people, so I have included a few presets. The names might give some hazy pointers to the type of sound, but this can be very subjective… One of my recent faves was ‘Angry Insects’…
UI
There is no need to be intimidated by all the sliders – just concentrate on one of the areas at once and you should be fine. There is always that big round ‘Release’ control – no connection to the Spitfire UI at all – that will help you to release the sounds from this virtual instrument!
As you can see, I’m exploring making my interfaces simpler, just as more complex interfaces seem to be more popular. Life is like that: some people are just out of step with the universe.
The sounds…
SWooh-arrMR2 is an atmospheric swarm generator. Use it to build tension before a break or a cue. Use it as an unsettling, busy pad without the cliches of violinists who have been drinking too much Red Bull, or of fast synth arpeggios. Use it in YOUR way, and invent a new cliche!
Unlike SWooh-arrMR1, this second sample set has a very different character. It is bold, distinctive, and very ‘springy’! I haven’t heard anything very like this in any commercial sample library, which could be a good thing, or a bad thing – but here it is on Pianobook.co.uk. Enjoy!
MIDI Controllers
1 ‘Modulation Wheel’ controls the Low-pass Filter Cut-off Frequency, the ‘Tone’
11 ‘Expression’ controls the output volume
19 ‘General Purpose 4’ controls the Reverb Wet/Dry mix
The video below shows how some bits of the user interface works, although it uses a very different instrument as an example. One day I may make a different video that is better suited to my latest controls…
V1.0
UI Video
Interface
Reviews
A very complex and diverse synthetic swarm bundle
At first, this might be a very intimidating experience, but after a while, you get the hang of it! It is basically a custom-swarm instrument based on different layers of sounds and articulation combinations.
You might not feel the need to tweak anything though, since you will find 10+1 different presets to get you started. If you still want to explore the potential of the instrument, I'd recommend you start by exploring each layer individually without any reverb, and gradually adding thing more depending on your liking.
I don't know what I just heard
but I like it! Global Swarm 2.0 I guess
It's basically a synthy tremolo with a lot of different presets, although they don't differ a lot in my opinion. Still very nice!