SFUK Water Bottle 2
Revisit and rework of SynthFest UK Water Bottle.........

The story
The very first thing that I ever sampled for Pianobook.co.uk was a water bottle from SynthFest UK, from the days when it was possible and legal and normal for hundreds of mask-less synthesizer fans to cram themselves together in Sheffield’s Octagon and drool over hardware…
So it seemed like now might be a good time to revisit my roots and revise/update/upgrade ‘my first’!
Decent Sampler and my abilities have moved on in the intervening time, and so this Sample Pack is a very different animal… You will need Decent Sampler 1.4.n to get all the features…
The sounds
I have cleaned up the sounds a little, swapped the mono versions for stereo, and added a new ‘Mid’-length variation. The ‘Fast’ version is a pure sample obtained by tapping the water bottle. The ‘Mid’ version processes the samples to give a longer, slightly more synthetic sound. The ‘Slow’ version throws caution to the winds and goes down the heavy processing route into long, synthetic territory – although despite my best efforts, there’s still a lot of metallic hit in there.
My slightly idiosyncratic, overly busy user interfaces have generated many comments on Pianobook.co.uk, and this is unlikely to be an exception. There are a couple of new features in use here, but my overall aim is, as always, to provide lots of value in a sample pack, and I do this by giving you lots of sound-making options and control. I rarely do ‘one sound’ sample packs!
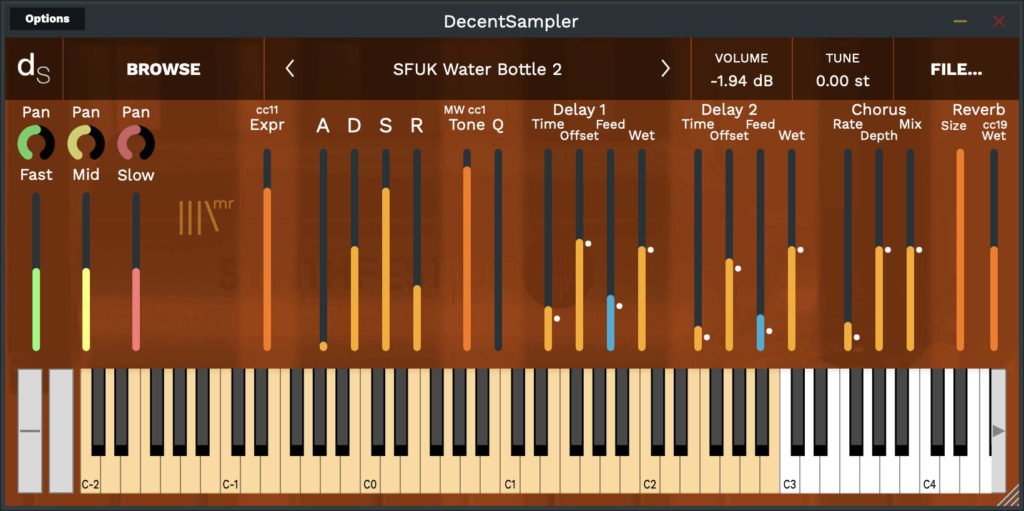
The user interface
From left to right, there are dark and light areas.
The mixer, or sound selector
The left-most area has three vertical ‘mic’ sliders, not unlike the ones that you get in many Spitfire Audio user interfaces. But instead of selecting the mix of microphones used to record the samples, I use them as a source mixer for the three sounds: Fast, Mid and Slow. When the bright bar is long, that sample will be loud, when it is short, the sound will be quiet. You can mix them as you will, which will give you quite a few sounds to play with…
Above the sliders are three pan controls. These place the samples wherever you want in the stereo field. If you put them in the middle, then you get full stereo output. Panning all three hard left or right will give you just mono in that channel. The rotary controls are not ideal for showing pan – you have to imagine that the left hand end of the curved bright bit is fastened in place, and the pan indicator is the other end, so hard left will have a very short, or no, bright bit. Mid position will have half of the curved bit bright. Hard right will have all of the curved bit bright.
– – – – –
I seem to be having problems with panning at the moment. You may find that only the Fast pan control works. Sorry! I’m trying to fix this… In the meantime, I have removed the Pan controls that don’t control pan!
– – – – –
Note that the processing on the right hand side can affect the stereo placement of samples…
The controls
Everything to the right of my III\mr logo is a vertical slider control, used to shape or process the sound.
– Expression
The first control is the ‘Expression’ control, mapped to MIDI CC 11. This just allows you to ride the output volume, and is just like the ‘Expression’ control that you get in Spitfire Audio user interfaces, except that it is a vertical slider instead of a big rotary control.
– Envelope
The next area is slightly darker in tone, and has four vertical slider controls which let you set the way that the sound starts, decays, sustains at a fixed level and ends. The ‘A’ slider is the Attack time – the start of the sound. Up is slow, down is fast. For drones, this will usually be set high so that the sound will start slowly. The ‘D’ slider is the Decay time – what happens after the attack. The ‘S’ slider is the Sustain level, which is where the sound ends up when you hold a key down. Finally, the ‘R’ slider is the Release time – how long it takes for the sound to fade away after you stop hiding the key down. So the sound gets louder at the rate set by the attack time, until it reaches maximum, then drops down to the sustain level, at the rate set by the decay time, and it stays at the sustain level until the key is released, and then it fades away at the release time rate. For slower, atmospheric pads, all of these sliders will usually be set near the top of their range longest times, highest sustain level, and so the coloured part of the slider will be big, and the dark part will be small.
– Tone
The next area is slightly lighter in colour, and has two sliders. The Tone slider controls the cut-off frequency of a 2-pole low-pass filter high is open, letting all frequencies through, low is closed, letting only low frequencies through – the Tone control is mapped to MIDI CC 1: the Mod Wheel the grey bar next to the virtual keyboard. The Q’ slider adjusts how resonant the filter is – how much it accentuates frequencies around the cut-off frequency. These are additional controls to the 10 options, which also let you select a timbre.
– Delay
The next area is darker, and contains one of the three audio effects in this instrument: the Delay effect creates echoes. There are four vertical sliders. The first is Time, and this sets the delay time up = slow, down = fast. The slowest delay is about 10 seconds, the fastest is almost immediately. The title grey dot on the right of the slider is there to remind you of the basic ‘home’ position – a mid-range setting that is probably a good starting point for exploration. If you get confused, then just set the sliders back to the dots and you should be back in control! The Offset slider adjusts the time for the left and right stereo channels, so the sound moves from side to sound in the stereo field. In the middle, near to the grey dot, the left and right channels will be delayed by the same time, but as you move the slider away from the middle, then the two channels will have more and more different delay times. The next slider is the Feedback control, and this is coloured green so that it is easy to see. For thick textures, then you want lots of slow repeated echoes, and so the delay time will be long, and the feedback will be set quite high up, at about 0.8. For thinner, more ‘initial reflections a la reverb, then short delay times and low feedback is de rigeur. If you change the delay time, then you may hear all sorts of weird pitch changed echoes, and one way to get rid of them is to reduce the feedback to zero for a few seconds, let them decay away, and then set the feedback back to where it was again. The final slider in this area is labelled ‘Wet’, and controls the volume of the echoes – the ‘Dry’ sound is always audible.
– Delay again
There is then a second delay effect, in a slightly lighter area. Having two delays allows lots more interesting syncopation and ping-pong stereo effects to be created, and can be huge and ponderous, or small and light depending on the delays times, the offsets, the feedback, and the Wet levels. Remember that the ‘Wet’ slider just adds in the delayed sound – the dry sound is always present. Remember also that if you get pitch change artefacts because you changed the delay time, then the GREEN sliders pulled to zero for a few seconds will remove them as the buffers empty…
“Empty the green buffers, please, Hal.”
“I’m sorry, Dave. I can’t do that.”
– Chorus
The next area is slightly darker, and has three vertical sliders for the ‘Chorus’ effect. This makes it sound like the sound is detuned. The Rate slider changes the speed of the wobbling of pitch – I have deliberately avoided the higher speeds that are possible with this implementation, and kept them slow rather than overly wobbly. The ‘Depth’ slider controls the amount of pitch wobbling. The ‘Mix’ slider controls the Dry/Wet mix – so it is different to all of the other ‘Wet’ controls! As with the Delay effect, the Chorus effect also has little grey dots that show you where to set the sliders if you get lost with making changes.
– Reverb
The final area on the right hand side is lighter, and has only two sliders. They control the Reverb effect yes, there are three effects, almost a guitar pedal board!. The ‘Size’ slider sets the size of the room that the reverb is emulating, whilst the ‘Wet’ controls is like the Delays ‘Wet’ sliders: it only controls the amount of reverberated sound that you will hear. The dry sound is always audible. The ‘Wet’ slider is mapped to MIDI CC 19.
Presets
Some of the reviews of my other Sample Packs said that there were too many controls, so I have included a few presets as starting points, as well as demonstrating the versatility of a water bottle as a source of samples. I’m curious to see if a Pianobook demo can be done using just this instrument! Gamelanelanelanelanelan e l a n…
MIDI Controllers
1 ‘Modulation Wheel’ controls the Low-Pass Filter cut-off frequency = the ‘Tone’
11 ‘Expression’ controls the output volume
19 ‘General Purpose 4’ controls the Reverb Wet/Dry mix
Keyboard
Eamon’s review noted the colours in the virtual keyboard that split it into three areas. The orange area is kind of the ‘recommended’ area, where the sampling artefacts aren’t too obvious (at the high end) and it isn’t too crazily muddy (at the low end). I’m not a fan of virtual instruments where you can only play within a range (that’s one of my synthesizer programming secrets – explore the areas that you aren’t supposed to!), and so despite the colours, you CAN play the entire keyboard (all of it!).
User Interface Video
Interface
Reviews
A bottle-oad of atmoshpere
Loads of atmospheric material here. Something about the modulation in those reverbs really does it for me.
The inclusion of a few presets each with their own character adds a lot to this library. And the GUI makes it easy to experiment (albeit guesswork at times).
The Upset Insects patch makes me want to write immediately. Great job!
Ethereal sound effects and hits!
This is more of an ambient sound effect instrument rather than one that offers tonal sounds. You have a big amount of presets available, and by default they are all very, very wet. In a typical writer's fashion though, you will see that all patches offer an incredible amount of options to mess with, including full ADSR settings, filter and depth effects.
As a tip, I find that the sounds are a little on the muddy spectrum, so I recommend applying some EQ to make it sit well on your mixes.
Idiosyncratic
I have a feeling that Martin's original Synthfest Water Bottle was one of the first packs I downloaded from the original Pianobook site, so it's only fair that I grabbed this one too.
It is such a different beast - cleaner and more tweakable than ever. Perhaps I need to cover my original demo with this version as I think my demo-writing skills have improved as much as Martin's Decent Sampler ones have :)