Drone Drone
Not the 1980s any more...........................
The story
Drone Drone? Is it pronounced: ‘Durone Durone’, perhaps?
Could this refer to an 80s band? ‘o’=’a’? ‘e’= (Base 64? URL encoding? )
Or is it a recording of a noisy flying device? Zzzzzzzz…
Actually, it is neither. This is the detritus of a failed project, an attempt to make a synthesiser using a sample player, which, despite many tens of hours of development, has become bogged down in deep technicalities and exasperating detail.
But from failure comes inspiration. What you have here uses the latest Decent Sampler additions 1.4.n to give you something that you may never have heard of, and which you probably never knew you needed. But be warned, the information that follows may be highly addictive…
Live electronic music performances come in many flavours. One of these flavours uses a lot of what are called drones – slowly evolving musical textures where notes fade in and out, sometimes over minutes, or even tens of minutes.
So when the aforementioned project became mired in ‘we need to fix that as well’ ‘opportunities’, I took the core of the idea and re-appraised it. It suddenly struck me that there was a way to utilise all the work in another way – as a drone generator.
And that’s what you have downloaded – or are about to!
– – – – –
Here are some notes on how it works, and how you can use it.
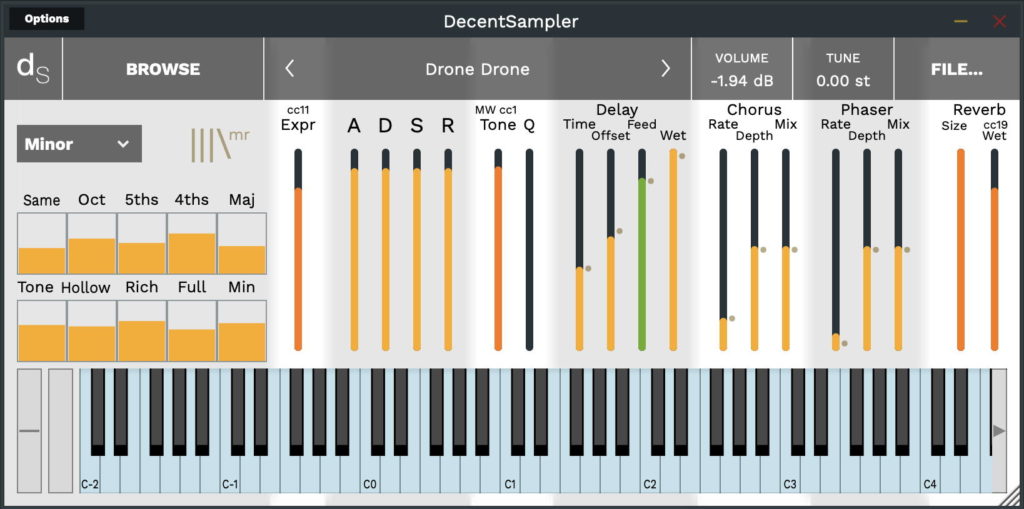
The User Interface UI may look scary and complex at first, but don’t panic! Lets break it down into sections:
Left-hand panel
On the left, there’s a grey area with 10 boxes, underneath a pop-up menu with 10 options. The boxes are ‘mic’ sliders – they control the volume of the sounds that are made by those 10 menu options. So think of it as 10 different ‘preset’ sounds. To select a sound, you just click on the pop-up menu and drag it down to one of the 10 options. The ‘mic’ sliders are named the same as the menu options, and you change the level by clicking in the box and dragging up or down – an orange bar will appear. Most times, you won’t need to have the volume more than about half-way up the box.
***
It is easy to miss the drop-down menu in the top left hand corner, and this may ruin your first experience of this Instrument/Sample Pack. (although I have edited the default .dspreset so that all the sliders are set to approximately mid-way…)
Just use the dropdown menu to select ‘Same’ and set the ‘Same’ slider – then you will hear something!
***
The 10 options produce different sounds, and react differently to the notes that you play on the virtual keyboard or via MIDI:
– Same – same timbre for each note you play, and the same note plays
– Oct – different timbres for each note you play, and random octaves for each note
– 5ths – different timbres for each note you play, and random 5th transposes for each note
– 4ths – different timbres for each note you play, and random 4th transposes for each note
– Maj – different timbres for each note you play, and random major triad transposes for each note
– Tone – different timbres for each note you play, and the same note plays
– Hollow – different square-wave timbres for each note you play, and the same note plays
– Rich – different modulated timbres for each note you play, and the same note plays
– Full – different sawtooth-wave timbres for each note you play, and the same note plays
– Minor – different timbres for each note you play, and random minor triad transposes for each note
The ‘Same’ option is a good place to start! Try slowly adding notes and listen to the result. Take your time: drones are meant to build slowly!
The options provide some hints of things to try: octaves, 5ths, 4ths, chords… But there’s nothing to stop you exploring other intervals and chords – use the Same, Tone, Hollow, Rich and Full options to avoid the auto transpositions. So, to sound kind of like Pink Floyd, just play Bb, F, G and E, the flat 3rd, flattened 7th, root and 6th/13th E natural of G Minor. For Genesis, just play the wrong bass note to an upper triad… Better yet, invent your own!
The 10 ‘mic’ slider boxes let you set the volume for each of the 10 options, so you can control which are loud, and which are quiet…
The sounds? Well, these are all hand-crafted synthetic sounds, made from scratch in Audacity by me.
Right-hand panel
To the right, there is one large panel, split into seven grey or white areas.
From the left to the right, the first one is the Expression control mapped to MIDI CC 11, a vertical slider which controls the output volume of Decent Sampler.
The next grey area has four vertical slider controls which let you set the way that the sound starts, decays, sustains at a fixed level, and ends. The ‘A’ slider is the Attack time – the start of the sound. Up is slow, down is fast. For drones, this will usually be set high so that the sound will start slowly. The ‘D’ slider is the Decay time – what happens after the attack. The ‘S’ slider is the Sustain level, which is where the sound ends up when you hold a key down. Finally, the ‘R’ slider is the Release time – how long it takes for the sound to fade away after you stop hiding the key down. So the sound gets louder at the rate set by the attack time, until it reaches maximum, then drops down to the sustain level, at the rate set by the decay time, and it stays at the sustain level until the key is released, and then it fades away at the release time rate. For making drones, all of these sliders will usually be set near the top of their range longest times, highest sustain level, and so the coloured part of the slider will be big, and the dark part will be small.
The next area is white, and has two sliders. The Tone slider controls the cut-off frequency of a 2-pole low-pass filter high is open, letting all frequencies through, low is closed, letting only low frequencies through – the Tone control is mapped to MIDI CC 1: the Mod Wheel the grey bar next to the virtual keyboard. The Q’ slider adjusts how resonant the filter is – how much it accentuates frequencies around the cut-off frequency. The ‘Q’ control is a bit tricky – raise it slightly and the sound changes in volume, so be careful! Don’t be afraid to try moving the Tone and Q sliders around – there is a lot of control over the timbre available! These are additional controls to the 10 options, which also let you select a timbre.
The next area is grey, and contains one of the four audio effects in Drone Drone: the Delay effect creates echoes. There are four vertical sliders. The first is Time, and this sets the delay time up = slow, down = fast. The slowest delay is about 10 seconds, the fastest is almost immediately. The little grey dot on the right of the slider is there to remind you of the basic ‘home’ position – a mid-range setting that is probably a good starting point for exploration. If you get confused, then just set the sliders back to the dots and you should be back in control! The Offset slider adjusts the time for the left and right stereo channels, so the sound moves from side to sound in the stereo field. In the middle, near to the grey dot, the left and right channels will be delayed by the same time, but as you move the slider away from the middle, then the two channels will have more and more different delay times. The next slider is the Feedback control, and this is coloured green so that it is easy to see. For drones, then you want lots of repeated echoes, and so the feedback will be set quite high up, at about 0.8. If you change the delay time, then you may hear all sorts of weird pitch changed echoes, and one way to get rid of them is to reduce the feedback to zero for a few seconds, let them decay away, and then set the feedback back to where it was again. So if you want to remove the weirdness, then just pull the green slider down for a few seconds and you will hear them stop, then put it back up again. Easy! The final slider in this area is labelled ‘Wet’, and controls the volume of the echoes – the ‘Dry’ sound is always audible.
The next area is white, and has three vertical sliders for the ‘Chorus’ effect. This makes it sound like the sound is detuned. The Rate slider changes the speed of the wobbling of pitch. The ‘Depth’ slider controls the amount of pitch wobbling. The ‘Mix’ slider controls the Dry/Wet mix. As with the Delay effect, the Chorus effect also has little grey dots that show you where to set the sliders if you get lost with making changes.
The next area is grey, and is the ‘Phaser’ effect. The controls are similar to the Chorus controls, except that the phaser changes the timbre cyclically rather the pitch. Again, there are default grey dots to show you the ‘home’ settings. The dots are there to make exploration less daunting – try moving the sliders and listen to what happens!
The final area on the right hand side is white, and has only two sliders. They control the Reverb effect…Yes, there are four effects in Drone Drone, almost a guitar pedal board!.The ‘Size’ slider sets the size of the room that the reverb is emulating, whilst the ‘Wet’ controls is like the Delay ‘Wet’ slider, it only controls the amount of reverberated sound that you will hear. The dry sound is always audible. The ‘Wet’ slider is mapped to MIDI CC 19.
Droning…
The basic idea behind making drones is to have a sound that fades in slowly and fades out slowly, and to add echoes to that so that it repeats over and over again, filling in the overall sound. By adding a chorus and phaser, the sound gradually changes in pitch and timbre, and finally the reverb ‘glues’ the sound together into one huge sound. If you move the Wet and Mix sliders down to their zero positions, then you will hear just the raw sound from the left hand grey panel, and you can then add in the effects on the right by raising the wet or mix sliders for each of the areas.
Presets
The basic preset is a classic drone generator: slow and gradual. Some of the other presets have shorter sounds and shorter delay times. Don’t forget to explore the menu options with each preset.
UI
Yes, the UI background is very simple, and not a photograph! This is because there is so much happening with all of those sliders that I thought a ‘no distractions’ approach was better, so I went a bit ‘ARP Odyssey White-Top’ influenced…
The grey and white areas are there to make it easy to see all of the different sections, without the visual clutter of vertical lines – there are enough verticals in all those sliders. There is no need to be intimidated by all the sliders – just concentrate on one of the areas at once and you should be fine. There are always the grey/gray dots to help you return to a default effect, and there’s that UI Video as well.
Think of it this way: a sophisticated user interface means more sounds and more control. Lots to explore!
MIDI Controllers
1 ‘Modulation Wheel’ controls the Low-pass Filter Cut-off Frequency, the ‘Tone’
11 ‘Expression’ controls the output volume
19 ‘General Purpose 4’ controls the Reverb Wet/Dry mix
The video below shows how the user interface works, although it uses a different instrument as an example.
User Interface Video
Interface
Reviews
There is a lot to unpack here
I had no idea DC could pull something like this off. This is an amazing sound exploration instrument. It deserves an afternoon of experimenting and discovery. The controls are easy to use and read. A lot of parameters got thrown in a simple UI without it being cluttered. There are heaps of wonderful sounds to be made here and it is well worth it to learn and use
The "Energizer" synth
Much as the eponymous hare, this one just keeps on going. It's complicated, obviously but it's always good to have lots of controls.
Re: #5, the pingpong preset, I just fixed and sent it to Martin.Creative Use of Decent Sampler
I think most of us Pianobook users think of Decent Sampler as a light weight sample player. This instrument really shows how much functionality is built in for those with tenacity and creativity. Very useful both for the sounds and for the underlying code to study. Especially for anyone who feels they must turn to Kontakt to realize their vision. By the way, the instruction manual above is a must read.