29 Bagpipes II
Reconstructing something that was never really there at all!.........

The story
A couple of years ago, very early on in the history of Pianobook, Christian Henson ran a competition to see if anyone could make a virtual instrument (a Sample Pack in modern Pianobook.co.uk-speak) from 51.1 seconds of some bagpipe players tuning up at Edinburgh Castle. At the time, I was still refining the Analysis/Synthesis-based (A/S) synthesis method from my AES paper that I presented at the Winter AES@NAMM 2018 conference in Anaheim, USA, and so I used it to separate out the harmonic and inharmonic content, and made a few examples in Kontakt and Ableton Live’s Sampler. It was my first ever Kontakt virtual instrument, and so, yes, I got the paths wrong!
Wind forward 2 years, and Decent Sampler has changed the world quite significantly, particularly for me making virtual instruments. So this seemed like a good time to revisit the ’29 Bagpipes’ source material and see what would happen when a two-years’ wiser me took up the challenge. Hence this ‘Story’ about ’29 Bagpipes II’, the successor to the now almost pre-historic: ‘Synthesizerwriter’s 29 Bagpipes’, which you can still find in one of the deeper recesses of the Pianobook.co.uk web-site.
The source material
Christian’s 51.1 seconds of audio is not exactly optimised for creating virtual instruments. There are no multi-samples of bagpipes, nothing at usably different velocities, lots of background noise, and lots of tuning up. All I had managed to extract was 4 notes, one octave apart, produced from spectral averaging, harmonic extraction, and a few other techniques that would probably bore you. Oh, and I also had 4 ‘non-notes’, which were the inharmonic residuals left over after all the harmonically-related material had been extracted.
Decent Sampler is capable of amazing results, but it isn’t well suited to two channel A/S synthesis, so this meant that I was more or less forced to use just the extracted harmonic sounds as the basis for this ‘second iteration’ virtual instrument development. But all I had were four notes, and no dynamics… So, after some modelling processing, I had 4 velocity layers for each of the notes, and I used my standard detuning technique to enable 3-way round robins.
Additional processing produced some different excitation, driver and resonator models, which I used to derive some alternative sounds. I then packaged all of this ridiculously over-the-top sample synthesis with my overly-complex user interface in Decent Sampler, and ’29 Bagpipes II’ was done, apart from checking the tuning (which I always get wrong), the audio levels (oops again), and getting distracted writing a blog post on how to prepare the required files for Decent sampler.
The sound sliders
There are 8 ‘mic’ sliders, which are effectively a sub-mixer that lets you choose a mix of 8 stereo looped samples, all of different lengths deliberately, of course! and do some simple panning, although Decent Sampler’s stereo chorus effect and reverb do blur the stereo image, so you need to turn them off and use outboard effects if you want more control over stereo imaging.
As almost always on my virtual instruments, there are different pitched versions of the raw sounds: home shown as 0 and one octave down shown as -1 from that.
The sliders are:
Normal 0 and -1: The first pair of mic sliders control the 4-part multi-samples spread across the keyboard range, with the four octaves in the middle, and the ends extended all the way to the MIDI note number limits of 0 and 127. Extracted samples from less-than-ideal source material don’t make matching across the joins very easy, so the joins are very obvious.
Touch 0 and -1: This uses spectral analysis to rank the timbres of the four multi-samples so that they can be used as four velocity switched layers. If you want control over the dynamics of the layers, then there is a ‘Dyn’amics control provided. Down removes the velocity sensitivity, up increases the sensitivity.
Dubl: This is a non-multi-sample version, but velocity switched sound, detuned slightly from the Normal sound. I love skying!
Roll: Another non-multi-sample version, but velocity switched sound – this time produced using more modelling, and maybe just too much detune…
Trem: If you already have admitted to having too much detune in another preset, then only a fool would go further, so here’s an even more detuned, further processed sound.
Reed: This is a reconstructed excitation sound with modelled velocity layers, and I like the raw feel that it has, so it is here so that you can add a little bit of extra spice to your sounds.
Remember that these are effectively synthesized sounds produced using raw material extracted from those 51.1 seconds of tuning-up audio, and not conventional samples at all. To my ears, the results have only a few artefacts of the original material and very few obvious giveaways of their very synthetic nature – but then I’m very forgiving…
– – – – –
Here are some notes on how it works, and how you can use it.
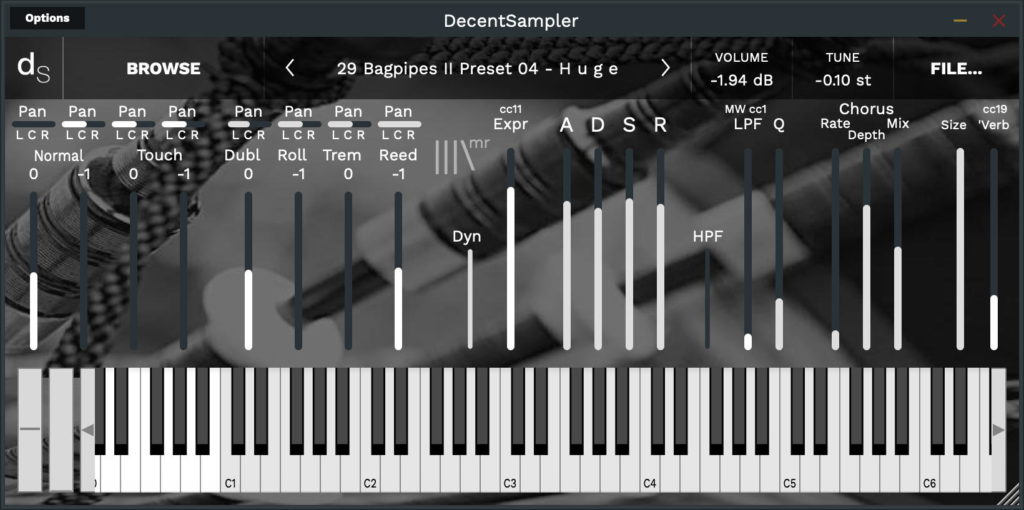
The User Interface UI may look scary and complex at first, but don’t panic! Lets break it down into sections:
Left-hand panel
On the left of my logo, there are 8 vertical ‘mic’ sliders for the 8 sounds sources – see the ‘Sound sliders’ section above for more details. Using ‘mic’ sliders can stress Decent Sampler’s polyphony under some circumstances, so don’t set all the 8 ‘mic’ sliders to maximum in the assumption that this is the best or optimal sound. Instead, use only two or three sliders at once less is more, and don’t go above half-way – the output can get loud, and the filter Q can emphasise some frequencies as well. In general, use one of the four Normal or Touch sliders as a starting point, and add a slider or two from the Dubl, Roll, totem or Reed sliders.
Right-hand panel
To the right of my logo, there is the ‘processing’ section, split into five areas.
From the left to the right, the first one contains a small Dynamics control Up = Velocity Sensitive, Down = no Velocity Sensitivity, and then the Expression control, which is mapped to MIDI CC 11, so giving a vertical slider that controls the output volume of Decent Sampler.
The next area has four vertical slider controls which let you set the way that the sound starts, decays, sustains at a fixed level, and ends. The ‘A’ slider is the Attack time – the start of the sound. Up is slow, down is fast. For drones, this will usually be set high so that the sound will start slowly. The ‘D’ slider is the Decay time – what happens after the attack. The ‘S’ slider is the Sustain level, which is where the sound ends up when you hold a key down. Finally, the ‘R’ slider is the Release time – how long it takes for the sound to fade away after you stop hiding the key down. So the sound gets louder at the rate set by the attack time, until it reaches maximum, then drops down to the sustain level, at the rate set by the decay time, and it stays at the sustain level until the key is released, and then it fades away at the release time rate. There’s a video below, featuring my ‘Mattress’ mega sample pack 2 Gibibytes!, that shows some of the envelope shapes that you can produce using the ADSR controls…
The next area has one small slider and two big sliders. The small HPF slider is a High-Pass filter, and this removes low frequencies from the sound, making it thin in timbre, and for lower pitched notes, even removing the fundamental. Most of the time, this can be set to the 0 lowest position. The LPF Low Pass filter slider controls the cut-off frequency of a 2-pole low-pass filter high is open, letting all frequencies through, low is closed, letting only low frequencies through – the Tone control is mapped to MIDI CC 1: the Mod Wheel the grey bar next to the virtual keyboard. The Q’ slider adjusts how resonant the filter is – how much it accentuates frequencies around the cut-off frequency. The ‘Q’ control is a bit tricky – raise it slightly and the sound changes in volume, so be careful! Don’t be afraid to try moving the Tone and Q sliders around – there is a lot of control over the timbre available! The sounds from the source sliders are deliberately bright, so that you can cull harmonics using the Tone control and the Q control. Have no mercy – filter those high frequencies out like it’s 1999…
The next area is a ‘Chorus’ effect. This makes it sound like the sound is detuned. The Rate slider changes the speed of the wobbling of pitch. The ‘Depth’ slider controls the amount of pitch wobbling. The ‘Mix’ slider controls the Dry/Wet mix. Slow is probably your instinctive speed for the Rate of the chorus, but when using a step sequencer then you might find that faster rates are surprisingly interesting…
The final area has only two sliders. They control the Reverb effect. The ‘Size’ slider sets the size of the room that the reverb is emulating, whilst the ‘Wet’ controls is like the Delay ‘Wet’ slider, it only controls the amount of reverberated sound that you will hear. The dry sound is always audible. The ‘Wet’ slider is mapped to MIDI CC 19.
Presets
My user interfaces UI are scary for some people, so I have included a few presets. The names might give some hazy pointers to the type of sound, but this can be very subjective…
UI
Yes, the UI background is a photograph of part of a bagpipe! And it is deliberately black and white – to reflect the original… There is no need to be intimidated by all the sliders – just concentrate on one of the areas at once and you should be fine. There’s also that UI Video below as well.
Think of it this way: a sophisticated user interface means more sounds and more control. Lots to explore!
The sounds…
Unexpectedly, there aren’t any bagpipe sounds! Don’t be fooled by the default preset – listen to ‘H u g e’ or ‘PowerSynthPad’ and you will get some idea of the tiny, delicate little sounds that 29 Bagpipes II can produce…
MIDI Controllers
1 ‘Modulation Wheel’ controls the Low-pass Filter Cut-off Frequency, the ‘Tone’
11 ‘Expression’ controls the output volume
19 ‘General Purpose 4’ controls the Reverb Wet/Dry mix
The video below shows how the user interface works, although it uses a different instrument as an example.
V1
User Interface Video
Interface
Reviews
A wonderfully characterful, mysterious sounding synth!
Even from just a quick play with each of the presets you can tell how versatile this instrument is! There are so many things to tweak! This does admittedly make the GUI a little overwhelming initially, but it's all fairly well labelled and documented, and really you just need to dive in and start experimenting. I look forward to doing some more of that, and discovering more sounds for myself, because it's very enjoyable to play, with a really inspiring, cinematic grandeur to it.
The 'bag-pipeness' (bagpipeosity?) isn't immediately evident in many of the presets, again showing it's versatility, but it gives a real character and backbone to the instrument.
Brilliant, and I should think inspiring both to the musicians and composers, as well as the instrument makers among us.A versatile bagpipe synth bundle!
This is a fun synthy instrument based on bagpipes. While you can sense the bagpipe sound, the instrument so versatile that you can grealtly alter the overall sound, from a smooth ambient pad to a techno-like piano pluck. It's big, it's wide, it is sampled very well, and it plays nicely as well. It has an infinite and well adjusted playable range, full ADSR controls and lots of other options to mess with. If the GUI seems overwhelming to you, there are 10 presets included in total.
As a tip, I recommend turning the overall instrument volume down and put it at least at -8db because it is extremely loud by default!
Can never have too many bagpipes.
Are you sure 29 is enough? I just love every backpipe instrument and this is no exception. Definitely recommended,