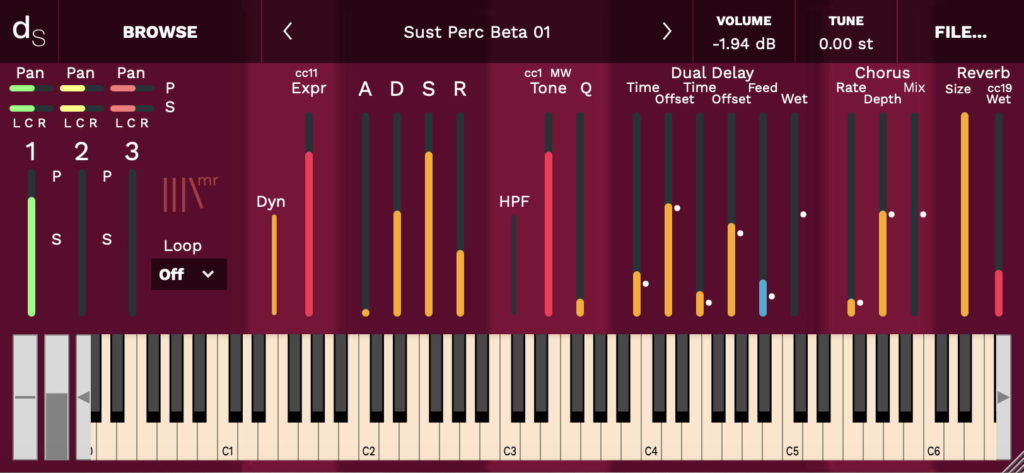
Sussed Perk Beta 01
Testing outside the boundaries... Basically I'm seeing if people want complex faders, or multiple envelopes...

The story
You know how it goes. You confidently say something, and even as you do it, there’s a snarky little voice questioning your certainty. Then, as the echoes of your speech fade into the carpet and walls of the room, your tummy gets that ‘Oh dear’ sinking feeling…
So, you now have what encyclopaedia sales-people used to call ‘an opportunity’. I’m seeing if there really is any gain to having a single volume slider that starts out at zero volume, then fades up into a sustained sound, and then cross-fades to a percussive sound, finally ending up with just the percussive sound. So there are three sliders in ‘Sussed Perk Beta 01’ (Yes, it is a play on words!) that are kind of doing the work of six. If it gets the thumbs up then I have other plans for sliders – see my ’synthesizerwriter’ blog on blogspot for more info.
The source material
More hand-crafted synthesis from someone who used to demo synths for a living, I’m afraid. Oh, and if you want more background, well, there are several thousand patches out there that are mine, but unattributed. I guess I’m the opposite of an influencer, but you’ve probably heard my work somewhere. One sample has been used all over the place!
(Alex’s review mentions the PlayStation 1. Some of my music HAS been used by Sony for a PlayStation 2 service, but I did not create the PlayStation 1 Startup Sound…)
The sound sliders: 1, 2 and 3
As I may have mentioned earlier, there are 3 ‘mic’ sliders, which are effectively a sub-mixer that lets you choose a mix of 6 stereo looped samples, all of different lengths (deliberately, of course!), as well as controlling the blend between a sustained version of each timbre with a percussive version. Move the slider to half-way up and you get the sustained sound. Move it up from there and you will find that the percussive version gradually gets mixed in, then becomes dominant and at the top of the slider, you get just the percussive sound. Two sliders in one, kind of, and an interesting exercise in using the amazing Decent Sampler. (Huge thanks, Dave!)
The block of six pan sliders in the top left hand corner allow you to do some simple panning across the stereo image, although Decent Sampler’s stereo chorus effect and reverb do blur the stereo image, so you need to centre them and use outboard effects if you want more control over stereo imaging.
The audio content of sliders 1, 2 and 3 is deliberately different:
1. A ‘Big’ wave-table synth sound. Not very subtle.
2. Not vocals, and not samples, but lots of vocal tract simulation instead.
3. Nasty and phased to within an inch of its life. Oh, and then copied and detuned too many times. Did I already say ‘nasty’?
Remember that these are just single samples stretched across the keyboard of this Beta version. They are actually just snippets from a multi-sampled set (and why not!) of sounds made from combinations of today’s software synthesis and what are sometimes politely called ‘vintage’ gear. BT isn’t the only guy who can do this type of thing!
– – – – –
Here are some notes on how it works, and how you can use it.
The User Interface UI may look scary and complex at first, but don’t panic! (Well, actually, you CAN panic because I’m not going to force you to do anything, but when you have calmed down, then come back here and continue reading.)
Lets break it down into sections:
Left-hand panel
On the left of my logo, there are 3 vertical ‘mic’ sliders for the 6 sounds sources – see the ‘Sound sliders’ section above for more details. I called them 1,2 and 3, which is simple and slightly mysterious. Sometime I must call one of my virtual instrument ‘Deimos’ and see if anyone gets the reference.
Using multiple ‘mic’ sliders can stress Decent Sampler’s polyphony under some circumstances, so don’t set all the 3 ‘mic’ sliders to half-way (sustain sound) or maximum (percussive sound) in the assumption that this is the best or optimal sound. Instead, use only one or two sliders at once (less is more), and remember that the filter Q can emphasise some frequencies as well. In general, and in complete opposition to my UI design style, less really is more – but a little bit of ‘dirt’ from another slider helps as well. So maybe it should be:
“Less, plus a little bit extra, is more, kind of. It depends, you know.”
Oh, yes, and there’s also a ‘Loop’ menu. This has two options: On and Off. Looping is On when the menu shows ‘On’, and ‘Off’ when the menu shows ‘Off. Sorry for the complexity!
Right-hand panel
To the right of the dark area containing my logo, there is the ‘processing’ section, split into six areas.
From the left to the right, the first one contains a small Dynamics control (Up = Velocity Sensitive, Down = no Velocity Sensitivity), and then the (volume as) Expression control, which is mapped to MIDI CC 11, which gives you a vertical slider that controls the output volume of Decent Sampler.
The next area has four vertical slider controls which let you set the way that the sound starts, decays, sustains at a fixed level, and ends. The ‘A’ slider is the Attack time – the start of the sound. Up is slow, down is fast. For drones, this will usually be set high so that the sound will start slowly. The ‘D’ slider is the Decay time – what happens after the attack. The ‘S’ slider is the Sustain level, which is where the sound ends up when you hold a key down. Finally, the ‘R’ slider is the Release time – how long it takes for the sound to fade away after you stop hiding the key down. So the sound gets louder at the rate set by the attack time, until it reaches maximum, then drops down to the sustain level, at the rate set by the decay time, and it stays at the sustain level until the key is released, and then it fades away at the release time rate.
There’s a video (below), featuring my ‘Mattress’ mega sample pack (2 Gibibytes!), that shows some of the envelope shapes that you can produce using the ADSR controls…
The next area has one small slider and two big sliders. The small HPF slider is a High-Pass filter, and this removes low frequencies from the sound, making it thin in timbre, and for lower pitched notes, even removing the fundamental. Most of the time, this can be set to the 0 (lowest) position – but experiment! The LPF (Low Pass filter) slider controls the cut-off frequency of a 2-pole low-pass filter high is open, letting all frequencies through, low is closed, letting only low frequencies through – the Tone control is mapped to MIDI CC 1: the Mod Wheel the grey bar next to the virtual keyboard. The Q’ slider adjusts how resonant the filter is – how much it accentuates frequencies around the cut-off frequency. The ‘Q’ control is a bit tricky – raise it slightly and the sound changes in volume, so be careful! Don’t be afraid to try moving the Tone and Q sliders around – there is a lot of control over the timbre available! The sounds from the source sliders are deliberately bright, so that you can cull harmonics using the HPF, the Tone control and the Q control. Have no mercy – filter those high frequencies out like it’s 1999…
The next area is a ‘Dual Delay’, based on the Delay that comes as standard with Decent Sampler, but modified a little bit by me. There are two time delays in this version, and two ‘Ping-Pong’ing Offset controls which change the time delay to the stereo channels as you move away from the half-way position. As with all dual delays, they are really thickeners – you use them to add depth and density to the sound, so you can use the synth programmer’s two fall-back techniques: similar settings for both, or very different settings on each. The feedback control adjusts how much audio is fed back into the two delay lines, and is coloured blue so that you can find it if you need to clear the contents of the delay lines – just drop it down to zero for a few seconds and the delay lines will empty. The Dry/Wet mix is probably best somewhere below half-way up, although you can go ‘Fully Wet’ if you wish.
The next area is a ‘Chorus’ effect. This makes it sound like the sound is detuned. The Rate slider changes the speed of the wobbling of pitch. The ‘Depth’ slider controls the amount of pitch wobbling. The ‘Mix’ slider controls the Dry/Wet mix. Slow is probably your instinctive speed for the Rate of the chorus, but when using a step sequencer then you might find that faster rates are surprisingly interesting…
The Dual Delay and Chorus effects have little dots at what I suggest might be seen as ‘default’ settings. Feel free to ignore them, but if things get crazy (a quick shout-out to Max Crazy from the Empress Effects Zoia Bootcamp), then just go to the dots and normal service should be restored.
The final area has only two sliders. They control the Reverb effect. The ‘Size’ slider sets the size of the room that the reverb is emulating, whilst the ‘Wet’ controls is like the Delay ‘Wet’ slider, it only controls the amount of reverberated sound that you will hear. The dry sound is always audible. The ‘Wet’ slider is mapped to MIDI CC 19. I over-use reverb, so your job is to reduce it! (Ever wondered why so many factory sounds have too much reverb on them?)
Presets
My user interfaces (UI) are scary for some people, so I have included a few presets. The names might give some hazy pointers to the type of sound, but this can be very subjective…
UI
There is no need to be intimidated by all the sliders – just concentrate on one of the areas at once and you should be fine. There are always the pink dots to help you return to a default effect, and there’s that UI Video below as well.
Think of it this way: a sophisticated user interface means more sounds and more control. Lots to explore!
The sounds…
Flutes? Not quite. Felt Pianos? Nope. Synthesisers? Yep! See what you think!
MIDI Controllers
1 ‘Modulation Wheel’ controls the Low-pass Filter Cut-off Frequency, the ‘Tone’
11 ‘Expression’ controls the output volume
19 ‘General Purpose 4’ controls the Reverb Wet/Dry mix
The video below shows how the user interface works, although it uses a different instrument as an example. One day I may make a different video…
V1
User Interface (UI) Video
Interface
Reviews
Stunning!
Not to be hyperbolic or overly simplistic, but this blew my mind with the depth of textures and amount of options for adjustment.
3x2 layers, unlimited options!
This is another great synth-based instrument by Martin, this time featuring 3 different layers, with each one having a different sound on left and right channel. You can mix and match the layers however you want, and you can also set how much of each channel you want - but for example, you can't bring the left to the right, unless you do that in your DAW.
The GUI is full of sliders for you to mess with, including full ADSR, filters, delay, reverb and chorus effects. If you are too confused by it, you can simply select one of the 9+1 presets available. I have to say that some of them remind me of the legendary PlayStation 1 startup sound effect!