Fairy Piano Extras
This is me 'Remixing' my own virtual instrument. Three revisions or re-imaginings of the Fairy Piano. It is VERY pink!

The story
The idea behind Extras came out of two different thoughts (the best ideas always do!). First there’s the forthcoming addition of ‘Collaboration’ features in Pianobook.co.uk, so that when two or more people work on something, then all of them can be credited. Second, there’s something that I have been including in my reviews – fragments of XML code to enhance, correct or subvert the functionality. Suddenly it struck me that what I was doing was a kind of ‘Remix’: a ‘hack’ of the XML code in the preset that gave new features, or twisted thing around into new sounds. Rather than do my first ‘Remix’ on someone else’s XML code, I’m doing it to myself! So what you have here are three extras: three reworkings of ‘Fairy Piano’ that show just how much you can transmogrify a virtual instrument in Decent Sampler without touching the samples…
Alongside remixing my own ‘Extra versions’, I’ve been collaborating with a number of other Pianobook.co.uk samplists, so you may well see more Extras appear. When the collaboration feature appears then it should make it much easier to do this kind of thing!
So what do you get?
Fairy Piano Reverse inverts almost everything that you know about a piano. The notes sound only when you release a note. The sound is reversed in time, so the sound builds slowly and ends abruptly. Crazy, weird, and not really usable, but it will make you think.
Fairy Piano Drone has very slow attack times, and provides control over the Sustain level (not available in the original), as well as very long Release times. The triple chorus provides three detuning sections for complex pitch modulation. The ‘FPD’ presets are all Fairy Piano Drone presets… This is definitely one of my favourites of my virtual instruments – it could almost be a whole release to itself!
Fairy Piano Inverted is very simple. The low notes are at the high end of the keyboard, and the high notes are at the low end of the keyboard. C is where you expect it to be – everything else is mirrored.
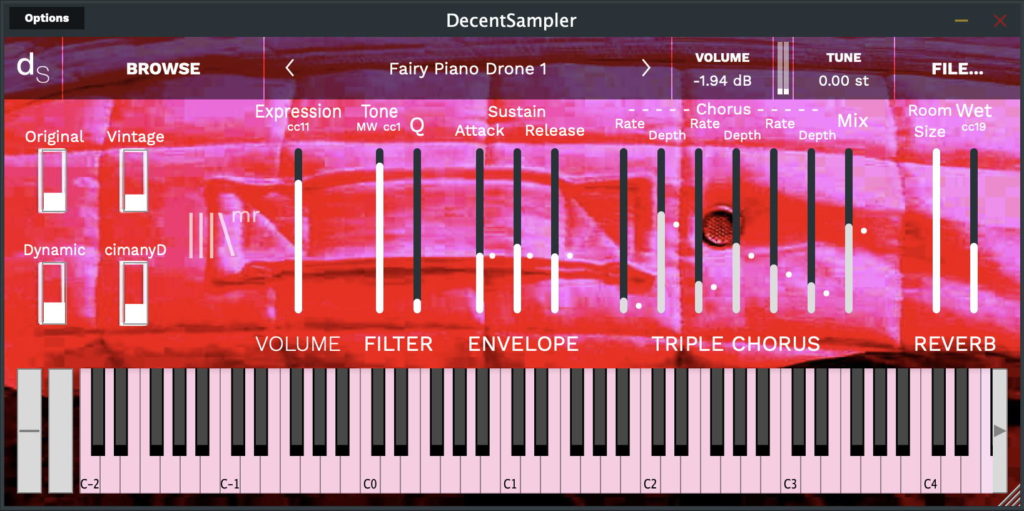
The Sounds – – – – –
To the left of my PBCU logo, the left hand side has four boxes (or a big round rotary control, and you know what to do with that – it is a single ‘mic’ slider wrapped around three quarters of a circle!). These are ‘mic’ sliders for four different sounds. If you drag upwards in one of the little boxes then a white rectangle will appear. Drag it to about a third or a quarter of the way up – more will just make the output louder!
The four ‘mic’ sliders can have different content depending upon which preset you choose! Some are octaves, some are chords, and some are random. Experiment and explore! Be inspired! Throw a few cushions around the room. Scream. Cry. You know the sort of thing. Just don’t break anything… and avoid anything which might leave stains.
The four ‘mic’ sliders can be used as a mixer, so you can mix the Original and the Vintage sounds as you will. There is no need to set the ‘mic’ sliders to full – this just makes the output louder! Generally, about a quarter of the way up is sufficient…
The Sources of the Sounds
I did all sorts of nasty things to some sine waves that were lying around in the studio. You wouldn’t believe the noises they made. Well, actually, you might.
Briefly, although a lot of the generation is pure maths crossed with knowledge of digital formats, all of the post processing and finessing is hand-tweaked, so this is arguably hand-crafted synthesis – just the opposite end of the scale from hypersawtooths, wavetable interpolation and other hi-tech glittery stuff.
The Controls – – – – –
To the right of my PBCU logo, there are a few controls. Taking them from left to right…
First, the Expression control, which is mapped to MIDI CC 11, gives you a vertical slider that controls the output volume of Decent Sampler. This is how you control the volume or loudness, of the sound!
Next, the Tone slider controls the cut-off frequency of a 2-pole low-pass filter: high is open, letting all frequencies through, low is closed, letting only low frequencies through – the Tone control is mapped to MIDI CC 1: the Mod Wheel the grey bar next to the virtual keyboard. The Q’ slider sets how resonant the filter is – at zero it is flat and boring, at 1 it is kind of peaky, but it isn’t the resonant 24 dB/Octave timbre-twister that you associate with analogue synthesisers. Don’t be afraid to try moving the Low-Pass Filter and Q sliders around – there is a lot of control over the timbre available! The sounds from the ‘mic’ sliders are deliberately bright, so you can cull harmonics using the Tone controls. Have no mercy – filter those frequencies like it’s 1999…
I have resisted the temptation to add full ADSR control over the envelope of the sound… Instead, just a few controls are provided, and the Attack and Decay are sometimes ganged together, just to annoy you.
You obviously aren’t listening as you read! As I just said, the Attack and Decay are ganged together – and they affect the start of the sound, and very soon afterwards as well.
The ‘Sustain’ control sets the level that the sounds will settle at when they keys are held down. In a piano, this is usually a low level, but for drones, then a higher level is more usual. The default is about half-way.
The ‘Release’ control is kind of like a ‘Damping’ control, but in reverse. The higher up the white bar is, the longer time that the sound will linger around. The lower the white bar is, the shorter the time that the sound will linger around for… You might want to try balancing this control with the Reverb control on the far right, of which more in a moment or two…
The next area is a triple ‘Chorus’ effect. This makes it sound like the sound is detuned, although deranged could be an alternative description for some settings. There are three pairs of ‘Rate’ and ‘Depth’ controls. The Rate slider changes the speed of the wobbling of pitch. The ‘Depth’ slider controls the amount of pitch wobbling. The ‘Mix’ slider controls the Dry/Wet mix. Slow is probably your instinctive speed for the Rate of the chorus, but when using a step sequencer then you might find that faster rates are surprisingly interesting…
The little grey dots on the right of the sliders are there to remind you of the basic ‘home’ position – a mid-range setting that is probably a good starting point for exploration. If you get confused, then just set the sliders back to the dots and you should be back in control!
When you have several chorus sections, then it is often best to start with making all of the settings similar but different. The defaults show this nicely – as the rate goes up, the depth goes down (often a good starting point). Fast Rates combined with high depths will give fast wobbles, and are probably best avoided.
The final area on the right hand side has only two sliders. They control the Reverb effect… The ‘Size’ slider sets the size of the room that the reverb is emulating, whilst the ‘Wet’ controls is like the Delay ‘Wet’ slider, it only controls the amount of reverberated sound that you will hear. The dry sound is always audible. The ‘Wet’ slider is mapped to MIDI CC 19.
Presets – – – – –
Some of the reviews of my other Sample Packs said that there were too many controls, so despite a merciless cull, I have also included a few presets as examples of what can be produced using this Sample Pack. These are not necessarily well tamed, so you may need protective clothing and goggles.
MIDI Controllers – – – – –
1 ‘Modulation Wheel’ controls the Low-Pass Filter cut-off frequency = the ‘Tone’
11 ‘Expression’ controls the output volume
19 ‘General Purpose 4’ controls the Reverb Wet/Dry mix
V 1.0
The UI for a very different instrument...
Interface
Reviews
Extra good!
This is wonderful addition to Martin's recent collection of dreamy instruments - and with a twist! You will find some patches that you might never find anywhere else, such as the inverted and reverse ones, which will kind of break your brain, but that's the point - I think!
It is worth it to take your time and explore all the patches and presets, though I want to state that you should also try all these sounds with a short/zero attack, so you get a synthy pluch sound. I personally found that very interesting and useful in most patches, and it completely changes the usability of the entire instrument.
The sampling is great, and the sounds are awesome, as expected, with a very resonant and ambient character that can dress up compositions of any kind.
If I had to mention something, that would be the "Reverse 1" patch ending up to a clicky sound which may be a little hard to deal with in a composition.